Teamwork Table – FineWoodworking
The table I just finished building is based on a joint I have been calling the “teamwork joint” for about 20 years. It was inspired by a poster I saw on the wall at an ad agency way back when. It looked something like this one:
The assembly is pretty much four long-grain butt joints, sometimes assembled with nails or screws. I made storage units, stools, rotating display cabinets, and desktop storage units but never used it for “real furniture” until now.
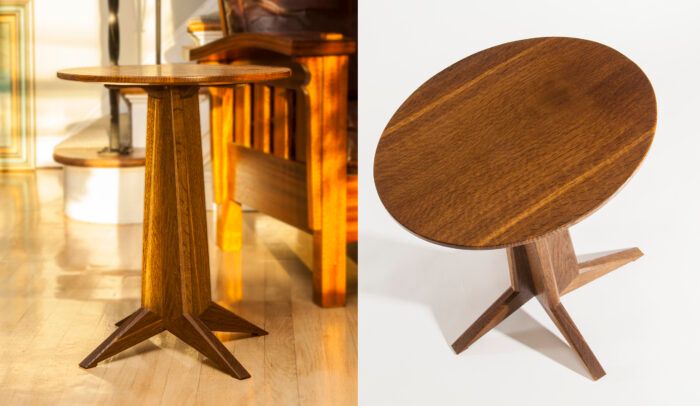
This small oval side table started conceptually as a Shaker stand in a Scandinavian or Craftsman style. I wanted to make the base “oval” like the top by varying the lengths of the legs while sticking with a symmetrical column pedestal design. As I sketched I knew I wanted to raise the table off the ground like a shaker stand and did not want to get too far into the rectilinear stick-ly side of Craftsman. Introducing angles seemed to help. My first draft of the table at quarter-scale was promising.
With the column tapering and the legs splaying at different angles, there was an interesting movement as you walked around it. Making the model taught me that the challenge would be in getting the long and short legs descending at different angles to touch down together. I worked up a scale drawing and roughed out the steps of my process. In this post I’ll show you how I make the parts for the table’s base.
Prototyping the table
Planning on making two tables, I checked the wood stash and found a white oak board 6/4 by 11 in. by 8 ft. It had some long checks in it, but the table parts were narrow and short, so it made the grade with enough for both bases. I also pulled a 5/4 by 11-in. by 5-ft. poplar plank to use for my prototype. After a day of milling, I had the parts for three bases. I put the oak aside and built the poplar table with a recycled beech top. It went well and helped define the jigs and refine the process. On to the oak …
The table as drawn stands 22 in. tall with an 18-in. by 15-in. oval top. The legs span 20 in. on the long axis and 17 in. on the short. There’s forgiveness in the process; missing the leg angles slightly won’t affect the table’s stability. You’ll see why later.
Jigs
The build revolves around four jigs. The first tapers the central column parts, the second and third taper the legs and help with the feet. The last jig is the key to the build. Jig #4 allows cutting the feet of the long legs AND short legs to form the foot pads, all at the same height from the bottom of the column to the floor.
If you already have a tapering jig, you can use it to cut the main column tapers. If you decide to build the table for a round or square top and want the legs to be symmetrical, you’ll only need one leg jig.
Start the column jig with a base panel about 6 in. by 24 in. Mark the ends of a column blank at 1.5 in. and 3 in., and lay it on the base of the column jig. Clamp it in place and add a long backstop to the base that lines up with the 3-in. end of the blank. Secure it to the base. Double-stick tape will work, but I screw them down hard because I use toggle clamps. Add a base stop block and the jig is done. Snug the jig to the table saw blade and cut the tapers on the column blanks.
Make the two leg jigs the same way using the angles from the drawing. Their bases are all 6 in. by 11 in.
All of the parts on the cutlist should be milled 4-square to start; with everything squared up there are fewer ways for things to go wrong. The leg blanks will produce two legs each, with the long-grain edges serving as reference surfaces during the build. The matching parts are interchangeable for now. Mill up your blanks and either make a few extras or make a couple from plywood or scrap for test cuts. Making the leg blanks longer adds room for error.
Mark each reference corner when you put it into a jig to make a cut. The parts will get more irregular in shape as you progress and mistakes will get easier. Set your rip fence to the edge of the column jig, and taper all four plus the extra test blank. Save the offcuts to use later as clamping cauls.
At 4 in. wide the leg blanks have some extra meat on them. Use the extra/scrap blank to sneak up on a cut that reduces the size of the waste between the legs. (Four identical legs could get the waste to zero.)
The leg cuts will NOT be on the edge of the jig; they will overhang it by about 3/8 in. This extra material will form the integral footpads later on.
With the parts all tapered, set up for some angled end cuts. Use whatever you have that will produce square, repeatable cuts. Repeatable is more important than accurate here. Having the blanks match each other is more important than hitting the angles perfectly. I did some fine-tuning to get my chopper squared up; all it took was a plane shaving inserted in the 90° stop.
Set up for a 30° cut placing the nontapered reference edge of a column blank against the fence and a stop at 19-1/2 in. Before you change the saw setting, cut a block of anything about the same thickness to the same angle to use in building jig#4. The angled face for the jig should be at least 5 in. wide.
Change the saw angle and cut the leg angles to maximize their length. I double-stick-taped a stop to the surface of the chopsaw. Cut the short legs at 42° and the long ones at 46°. Again, make sure they are square cuts and match each other. The angles should be close but are not critical.
Use the cutoff you made at the 30° column angle to build jig #4. The jig has a small base block and the 30° block facing the blade. Mount a leg blank and sneak up on a cut that leaves you about a 1-in. flat for the foot pad. Before taking the first leg out of the jig, make a registration mark where the top of the foot (which is the inside of the “ankle”) lands on the jig.
The rest of the blanks go into the jig aligned to the mark. This is where the TOP OF THE LEG MEETS THE COLUMN—not against the base of the jig. Without moving the fence and using the same mark, cut all four footpads. Now all of your legs are the same height from the column base to the floor regardless of their angles.
This is a good time to lay out your column and leg blanks and marry them into pairs. You’ll be able to see them from all angles, so flip and sort them until you have the best possible match for grain and color on all four sets. Number them on the inside of the joint. Press each pair together, aligning the inside of the ankles and leaving all extra material hanging below. Mark the overhang on the leg and a line on both faces where the footpad will end.
Make a simple flush-cut fence for the bandsaw and tape it to the table. You should be able to slide something past the blade and barely contact the teeth.
Place each leg back in its jig and slide it up until the line you marked presents to the blade.
Bandsaw up to the pad line before backing out of the cut.
Then cut the waste away with a handsaw.
In the next post we’ll assemble the four pairs and build the column.
After 35 years in architectural photography, Myko now works as a consultant, employing the same skill set toward environmental compliance. He holds three U.S. patents and is the inventor and manufacturer of Tailspin Collinear Marking Tools. A woodworker of 50 years, he got started with an X-Acto carving set and a block of balsa on his 10th birthday and just kept going.
Fine Woodworking Recommended Products

Drafting Tools
Add a hole guide to this kit, and you’ll have the tools you need to work out your designs with scale drawings.

Circle Guide
If you like to draw your designs on paper, you’ll find the simple circle guide to be very helpful.

Compass
An essential tool for drawing circles and curves accurately. Also good for layout.
Sign up for eletters today and get the latest techniques and how-to from Fine Woodworking, plus special offers.


