Krenov-Inspired Coopered Wall Cabinet – FineWoodworking
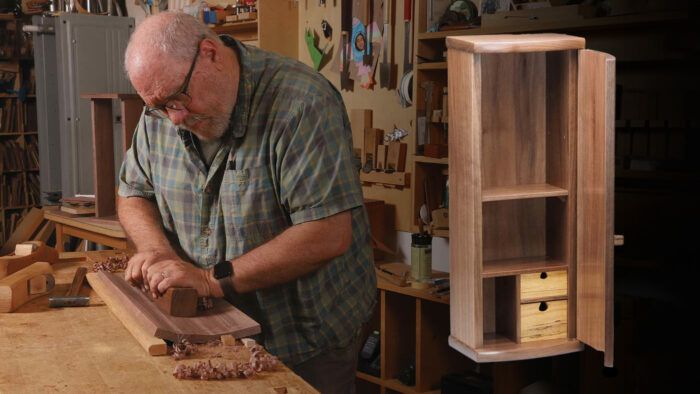
Many years ago, I made my first coopered-door cabinet while studying furniture making with James Krenov at the College of the Redwoods (now the Krenov School) in California. The coopering process Krenov taught—using hand planes we had made ourselves to bevel the staves and to fair the curves on both faces of the door—was a good fit for me, a very hands-on, intuitive way of working that resulted in a door that takes an asymmetrical curve, a dynamic and personal shape rather than a mechanical arc.
Years later, while passing along Krenov’s coopering technique and his approach to furniture making to my wife, Mami, who trained as a furniture maker in Japan, I arrived at the design of this petite wall cabinet. Teaching it to her required me to put the making process into clear words, describing the how and especially the why out loud. Although the cabinet is small, it’s not especially fiddley, and it introduces a surprising number of skills. Rebuilding the piece again now has recalled for me the importance of keeping steps in sequence while also leaving room for changes or ideas that emerge as you work.
The door is decisive
A cabinet’s case is usually made before its door. But here the curved door is the starting point for both the design and the construction. Making the door first allows you to draw a curved line you like—and a coopered door to match—without being restricted by existing cabinet dimensions. Working this way also lets you respond more flexibly to the grain in your plank.
I chose an 8/4 walnut board for this project. The door is the focal point, so I chose the best part of the plank for the door. I wanted a balanced pattern of fairly straight grain, a pattern that could be sawn into staves and then reassembled without being greatly disturbed, and one that would make a visually smooth transition from the door to the cabinet sides.
When separating a board into staves and aiming for invisible joints after it’s reassembled, riftsawn or quartersawn grain is generally best. I avoid flatsawn grain with prominent cathedral patterns, which are very difficult to reassemble in a believable way. I also avoid interrupting shifts in color that will make reassembling hard to pull off. I milled a blank for the door several inches wider and longer than I thought the finished door would be, and about 1/8 in. thicker.
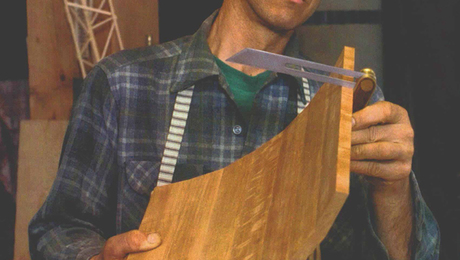
Draw the curve of the door using a thin wood batten. I drew an accelerating curve rather than a true arc. The curve determines the width of the staves to be cut from the door blank. The tighter the curve, the narrower the staves. For a door like mine that follows an asymmetrical curve, the width of the staves will differ, as will the bevel angles.
Bevels and curves
I use hand planes to slightly bevel the long edges of the staves so that when each pair is squeezed together, it closely matches the drawn curve. I prefer to use my shopmade wooden hand planes for this. These planes put my hands very close to the work surface, and I’m able to feel the results of any subtle changes that are happening during a pass. One plane is set to cut slightly deeper, and I use it to establish the bevels. A second plane, set for a finer cut, takes the final couple of passes, sitting on the bevel created by the first plane.
Both planes have their blade set parallel with the plane’s sole. The beveling is accomplished by tipping the plane very slightly to one side during each pass, or by keeping the plane flat on the stave’s edge but with most of its mass overhanging one side, which will result in taking a slightly thicker shaving on that side.
When you’re happy with the joints, edge-glue the staves as shown in the photos below:
Clean the coopered curves
To fair the inside of the door, I use a shopmade round-bottomed plane. Early on, with quite a bit of shaping to do, I plane with the blade set heavy. Once the concave surface looks nicely curved and fair, I back out the blade for a lighter cut and refine the surface.
The door’s convex side is faired with a flat-bottomed plane. Start by planing the beveled joint areas, then work the highs and lows into a smooth curve. Not much material is removed from the door’s thickness when coopering using these techniques.
Making the case
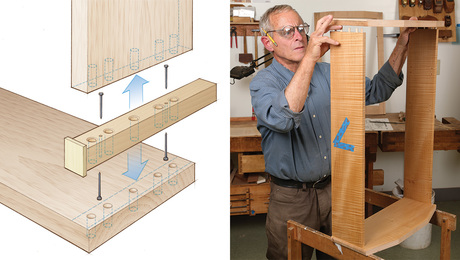
As Krenov did, I chose dowel joinery for the cabinet construction. There are seven 1/4-in. dowel pins in each corner of the cabinet. When executed accurately, these joints are very strong. Using dowel-pin joinery—instead of dovetails, for example—allows you to inset the sides from the case top and bottom, opening the door for creative details. Just like dovetail or mortise-and-tenon joinery, dowel-pin joinery needs to be done precisely and with care.
The process starts with a custom doweling jig. It’s simple and quick to make—just a short stick of hardwood with a cap of 1/8-in. plywood tacked on one end. The plywood overhangs the stick and serves to register the jig on the workpieces. The holes in the jig need to be very accurate, so use a drill press to cut them.
For drilling into the endgrain of the case sides, the jig is placed flush to the inside face of the workpiece and fixed with brads. Because the dowel holes in the case top and bottom are inset, I made a cleated MDF spacer to locate the dowel jig. Simply center the spacer on the workpiece and then register the dowel jig against one side of the spacer and then the other.
 |
 |
The cabinet is dry-assembled and disassembled quite a few times as it’s being built, so until final glue-up I use just two dowel pins in each joint. When the time comes for the actual glue-up, these temporary dowel pins are discarded and a full set of new pins replaces them. Take the time to track down dowel pins that fit very snugly. I use 1/4-in. pins from Lee Valley. I’ve found others often were undersized.
Splines for the dividers
 |
 |
| Groove the dividers. To cut spline grooves in the dividers, use the same bit at the router table that you used in the handheld router, and make the grooves stopped at the front. | |
 |
|
| Make a spline blank 1⁄8 in. thick and 4 in. or so wide, with the grain running along its length. This will make for strong splines with no movement issues. Cut individual splines from the blank with a handsaw. |
The splines get glued into their dividers before final cabinet assembly. To ease insertion, slightly chamfer the edges of the spline and the spline groove with some 150-grit sandpaper wrapped around a small block. |
Fitting the door
With the case dry-assembled, trim the door at the table saw to just over final width, then cut it for a tight fit in height. I use a shooting board to square the bottom of the door, then shoot the top edge until it just fits. Set the door in place and check for any wind or twist. If need be, plane a little more off opposite inside corners of the door until it closes tight to both case sides.
 |
 |
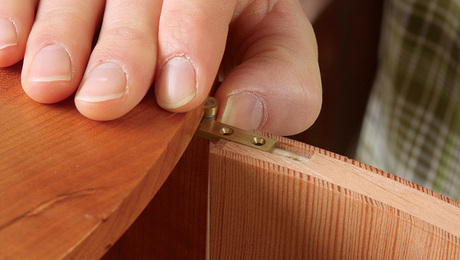
Next, install the knife hinges. Doing so before the case is glued up lets you mark for the case leaves with the case dry-fit and then disassemble to rout and chisel the mortises in the case top and bottom. (For a full explanation of knife-hinge installation, see “Knife Hinges Made Easy” by Chris Gochnour, FWW #318.) The only difference between mounting knife hinges in a standard overlay door and this curved one is that here the case leaf will be set on an angle that mirrors the curve of the case’s front edge.
A carved door pull was always a special detail on a Krenov cabinet. The mortise for the pull can be made with a small router and a 1/8-in. router bit. Since the door is curved, double-stick tape a spacer strip to the door, creating a platform for the router to ride on.
To make the pull, mill a piece of hardwood to about 3/8 in. thick, 7/8 in. wide, and 9 in. long; a long blank is easier and safer to work with. On both ends of the stick, cut a tenon to fit the mortise in the door. Having a tenon at each end gives you the option to make a second pull if you are unhappy with the first one.
Carve as much of the pull shape as possible while the stick is long. Then cut the pull off the stick with a handsaw and complete the carving. For the last bit of carving, I hold the tenon in a small vise.
Door meets cabinet


 |
 |
Cabinet glue-up
Before you glue up the case, make sure that all surfaces have been hand planed (or sanded), the corners have been eased, and shellac and wax have been applied (except in the drawer pockets). Hide glue, with its long working time and reversibility, is an excellent choice. I use Old Brown Glue, which is very easy to work with.
Assemble the cabinet using a mallet, strong clamps, and padded cauls. Clamp tight, and check for squareness, slightly readjusting the clamps if it’s out of square. I clean up any glue squeeze-out with a plane blade after the glue dries; since the cabinet was finished beforehand, the dried glue comes off easily.
For the back of the cabinet, I glued up a panel with a 1/4-in. Baltic birch core and shop-sawn walnut face veneers.
The back edges of the cabinet may not be completely flush after the glue-up. With the door removed, position the cabinet face down on a padded surface, and use a long plane to even up the back edges of the sides, top, and bottom. Plane the back panel to fit and then, after masking off its edges, apply shellac and wax. Then glue it in, using just a small amount of glue along the edges of the rabbets. Lightweight clamps and padded cauls will help to protect the back panel.
To hang the cabinet, I made my own keyhole hardware out of brass bar stock. The process is simple: Using drill bits of different sizes, drill two holes to create the top and bottom of the keyhole slot. A file removes the waste material between them to create the keyhole shape. Drill and countersink mounting holes for small brass screws. Mortise the hangers into the back of the cabinet, and deepen the mortise slightly at the center to accommodate the head of the wall anchor bolt.
Craig Vandall Stevens is the program director and primary teacher at Philadelphia Furniture Workshop.
Fine Woodworking Recommended Products

Blum Drawer Front Adjuster Marking Template
This template acts as a “dowel center” for punching a hole to mark where to drill fro clearance holes.
Sign up for eletters today and get the latest techniques and how-to from Fine Woodworking, plus special offers.


