Teamwork Table: Part Two – FineWoodworking
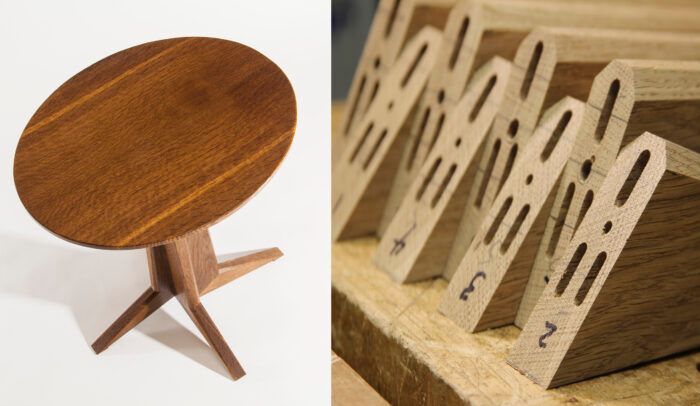
In the last post, Teamwork Table, we cut out all of the parts to build the central column and married them into pairs with each foot and a column leg matched up for grain. Now it’s time to assemble each pair, and then the full pedestal.
To join the legs to the column sections I use a Festool Domino, but floating tenons or splines or dowels or even screws will do the job as you’ll see shortly. For irregular small parts I vise-mount the domino upside down in a simple fixture [[ https://www.tailspintools.com/benchtop-domino]] and bring the work to the tool.
I used a heavy tenon at the ankle where there is the most depth and shorter twins below. Flipping the work makes the twins self-centering, but the single large tenon is not… Be careful to keep your reference surfaces straight!
The shortest grain on both parts will be in compression at the ankle with the long grain along the outside edges in tension at the heel.
Leg Glue Up
These are some awkwardly shaped parts to glue together. After testing cauls with hooks, glue blocks and a couple of table-mounted wedgie-thingys, I arrived at a K.I.S.S. solution: Screws as clamps.
The vertical edges of each leg will be invisible after final assembly. Why not screws? After testing on scrap parts I drilled a tiny pilot hole in the column blanks centered on the dominos and perpendicular to the joint line. Follow the pilot hole with a long drill bit right out through the back of the column.
Try to keep it on track. Mark a line perpendicular to the drill line and chop in a ramp until you’re deep enough for long screws to have good purchase (these are 4”). Use a washer on the screw to avoid splitting.
If your bit wanders you can force it back now with a bit large enough to let the screw threads slide through the column. Make a deep centerpunch on the leg blank where you want the screw to go and dry assemble the joint with the dominos. Use the long bit to drill the pilot hole in the leg… it should find the centerpunch.
Be careful not to drill out through the bottom of the leg… or don’t be… it will be hidden underneath in the end. I used a soda straw as a depth stop.
Before glueup, clean up the front-facing “ankle side” surfaces and add any planned edge treatments. If you stuck to the reference surfaces all of the planing will be down-grain and downhill from the joint line.
I planed bevels that taper from 3/16” at the joint out to almost zero at the toe and the top of the column. Pre-assemble and perfect the matchups, then add some glue and drive the screw.
Get the screw almost set and put a couple of clamps across the joint to keep it from torqueing out of alignment. There’s no harm in leaving screws in there if you want to. For a light table like this a single screw with two dowels would probably do the job.
Column Assembly
With the leg assemblies glued up you have decisions to make. The first is the final height of the table. If you know where it is going to live, mock it up to see how it fits. Some double-stick tape will get you there. I lowered this one to fit next to a chair, taking 1½” from the top of each leg assembly at the chop saw.
There are options for how to assemble the column, each with a different look. Three of them are below. Larger or smaller spacers, no spacers, and parts orientation all affect the look. A rectangular spacer could accentuate the variations in the base. You need to decide now because we’ll be cutting channels for the top support before we glue up the base. I chose the far-left option above with a 3/8” spacer.
I used the cutoffs to mark out crossing dados for the top supports. Lay out the dados on the BOTTOM of the cutoffs which are close in size to the top of the tapered columns parts.
Use the cutoffs on a sled to set the cut depths at the table saw. My cuts to each leg are identical and run in a circle around the center. If you used an asymmetrical spacer they won’t be. Take your time marking cuts and waste… remembering that the offcuts’ layout is upside-down. Free the waste at the bandsaw.
Pre-assemble again and mark your parts for final assembly. Now that the notches (which become dados to hold the top upon glueup) are cut the parts are no longer interchangeable. They have to go together the same way you marked and cut the notches.
Mark each joint in a way you cannot mistake. I used tic marks in different colored pencils across each. If you are using a center spacer mark the opening all the way around with a black marker.
When cutting for dominos, I used a 3/8” thick spacer to cut the faces with the black center marks. With all of the joinery cuts done this is a good time to do any sanding or other cleanup work before assembly.
Find the cutoffs you saved when you from tapered the columns and use them as cauls to glue up pairs with 1 short and 1 long leg. Once cured, assemble the pairs to complete the column.
In the next post we’ll make top supports and drawbore them to the column. Then we’ll make the top and finish up.
Sign up for eletters today and get the latest techniques and how-to from Fine Woodworking, plus special offers.


