
From the Archives: The Tools and Techniques to Rive Wood

This is an excerpt from Fine Woodworking #12, Fall 1978
Click here to read the full digitized issue.
Many craftsmen today have little, if any, experience with the ancient practice of cleaving. Yet before factory-made saws became widespread, cleaving and hewing with an ax were the primary means of reducing wood in size or dividing it into smaller pieces. In cleaving, a tree trunk is split lengthwise into halves, then quarters, and sometimes eighths or sixteenths, depending on the diameter of the log and the intended use of the wood. The resulting pie-shaped pieces are squared with a drawknife, then cleaved along tangents to the annual rings with a froe or knife into halves, quarters, and so on. These tools allow the use of leverage to follow the grain rather than a straight line, which a saw must do.
Cleaving has advantages over sawing. Because cleaved material follows the long fibers, it is much stronger than wood sawn by hand or machine. With cleaving, there is no sawdust, but more waste. Cleaved wood will take and hold bends better than sawn wood. And cleaving is faster than hand-sawing.
The crudest examples of cleaving are fence posts and rails, especially black-locust posts and oak rails, which are renowned for their strength and durability. At the other extreme are fine, yet very durable, baskets, woven from splints of white oak, ash, willow, or hazel. Other traditional uses of cleft (or riven) wood include shingles, wall lathing, tool handles, bucket staves, special dowels, “tree-nails” (pegs used in timber-frame buildings), ladder rungs, agricultural implements, and small boat ribbing. The technique of cleaving also lends itself to carving projects and chairmaking.
Equipment
Cleaving requires a few basic tools. A peavey or cant hook is useful for maneuvering logs more than 1 ft. in diameter. A 6-lb. to 16-lb. wedging maul (“go-devil”) or a sledge hammer, a heavy wooden cudgel, two or three iron wedges (a narrow timber wedge is handy), two wooden “gluts” (large wooden wedges), and a hatchet are useful for splitting the log longitudinally. Gluts are easily hewn from any straight grained hardwood, usually saplings or limbs of hickory or oak. The beveled sides should be flat. Chamfer the edge around the head to prevent premature fraying. Gluts should be seasoned about one month before being put to use, lest they split and fray too easily. Gluts can be driven with a sledge or go-devil, but will last much longer when pounded by a wooden cudgel. A “brake,” or hardwood crotch, holds the wood when the smaller sections are cleaved with a froe and froe club.
The design and workmanship of the froe are critical to its effective cleaving. A froe blade should be 6 in. to 10 in. long, and at least ⅜ in. thick. The cross section of a good froe has a narrow angled edge formed by slightly convex tapered sides beveled the full width of the blade. The back (striking) edge should be nicely rounded to minimize wear on the froe club. Froe eyes are forged or welded shut. The orifice must be smooth. Froes with a tapered eye use a swollen handle, not unlike an adze or mattock haft. These seem to work loose just as easily as round eyes with parallel sides. The handle should be 1-½–2 times as long as the blade. It may be any stout hardwood, cleaved of course, then well seasoned before fitting. A small wooden wedge should be dabbed with glue and driven into a slot sawn across the end grain.
I have found that a long narrow club is most convenient for cleaving with a froe. A short fat club tends to be in the way. Froe clubs are made from almost any dense hardwood. I’ve used apple, hickory, dogwood, and oak. Clubs made from green saplings and limbs generally check. To avoid checks, use a quarter section from a larger tree. The club (which is unavoidably expendable) should be seasoned a few weeks so that its surface hardens before it is used.
Woods
You can cleave a fairly wide range of deciduous and coniferous woods. For work that requires strong or tough materials, select oak, hickory, ash, or locust. White oak makes fine splints and is used in many bending applications. Most other Eastern oaks cleave nicely, except for maul oak and swamp white oak, both of which are almost impossible to split. Hickory, of course, is famous for toughness and ability to take impact, but it is rather stringy and sometimes hard to work (especially when seasoned). Ash is lighter and very nice to split. Locust cleaves easily, but the grain usually warbles, resulting in distorted splints that are “foxy” (uneven or brittle). Beech was preferred by English chair bodgers, the itinerant woodsmen/turners who traditionally made legs and rungs for Windsor chairs.
Among the softwoods, one can choose from pine, hemlock, cedar, and redwood. Very fine-grained pine makes superior bucket staves, and sometimes excellent shingles. Hemlock cleaves very easily, though the grain may twist or warp. Its main use is tobacco sticks and tomato stakes. Cedar and redwood may be cleaved into shingles, or made into long-lasting fence posts and rails.
Short bolts of many other woods, such as apple, linden, walnut, dogwood, and holly, can be cleaved into chunks for carving and bowl- and spoon-making. Hazel is traditionally used for bucket hooping and basket materials. Willow rods make nice baskets, too. Until the blight, chestnut was often cleaved for fence posts and shingles.
Felling a tree
When choosing timber for cleaving, select straight-standing trees that are free of knots, scars, twists, or other irregularities. White oaks for basket splints should be 5 in. to 8 in. in.dia., with minimal taper at the butt end. Trees with evenly spaced annual rings are preferred, but you can know this only if you have already taken other trees from the same site.
A large body of folklore suggests the ideal time of year, phase of the moon, and prevailing wind conditions for feeling. A compilation of all this advice quickly leads to contradictions. My experience in felling trees at various times throughout the year has led to no conclusions whatsoever. I have cut white oaks for basketry that were of the same age and that grew side by side; I found one beautiful to work and the other only mediocre. In general, I recommend cutting trees for cleaving as near as possible to the time when the wood will be worked or used. Oak shingles, for instance, should be rived out and installed green; seasoned shingles may warp or split while being nailed. An exception would be where well seasoned material is needed, such as for bucket staves, in which case the wood should be bucked and cleaved into quarter or eighth sections whenever possible.
For reasons of aesthetics and conservation I prefer to fell timber as close as possible (almost flush) to the forest floor. Discard the lowermost section of stump if it’s tapered or punky. Buck the log into bolts. Length depends on intended use: from 20 in. for shingles to 10 ft. for fence rails.
Cleaving the log
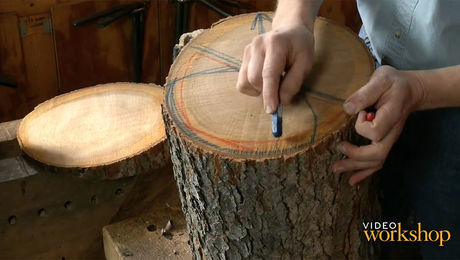
Using a wedge and maul, score a radial line from the central pith to the bark. If the wood is already cracked, you must follow along the cleft, because it’s impossible to control cleaving once the integrity of the annual rings is broken. I begin by driving a wide, flat timber wedge into the end grain , but one can use a regular splitting wedge. In either case, the first wedge will open a cleft along the bark.
Insert a splitting wedge and drive it within an inch of its head. The cleft will lengthen as the wedge is pounded into place. Place another wedge into the cleft where it’s ⅜ in. to 5/8 in. wide. Again, drive to within an inch of the head. Leapfrog the wedges one past the other until the end of the log is reached. Occasionally a wedge will stick in place. Tapping the sides of the head to the left and right will usually free it. At this point small or easily cleaved logs simply break apart. Tougher logs require a pair of gluts. When inserting a glut try to find a place free of cross fibers. More gluts are ruined when the leading edge intersects cross fibers than by damage caused by pounding. Leapfrog gluts from one end to another, as with iron wedges.

If the log still isn’t halved, roll it over and look for any incipient cracks on the reverse side. Sometimes it’s necessary to clear off bark with a hatchet before any fissures are located. Drive wedges or gluts into the back side. The log should divide into halves, although it may be necessary to sever stubborn cross fibers with the hatchet. I prefer to do this kind of hatchet work two-handed. Be careful not to strike implanted iron wedges.
Follow the same procedure for cleaving quarter sections and eighths, if the bolts are still too heavy to haul to the shop. Green-worked wood should be left in sections that are as large as possible, because small segments dry out much faster. Big sections, however, check more as they dry. Wood should be removed from the forest floor. Many species are subject to invasion and attack by fungi and insects. Ambrosia beetles infest and ruin oak felled in the spring and summer.


The next step is cleaving the radial sections. Most craftsmen hold the wood in place with a brake, a narrow crotch from the trunk or branch of almost any suitably shaped hardwood. The brake may be lashed to posts driven in the ground. Or, lay the big end across a log and support the legs with two saplings placed opposite each other, each one running beneath the near leg and above the far leg. The saplings work against each other, and the device is surprisingly rigid and self-supporting. Insert the wood into the brake. Place the froe crosswise at the approximate halfway point, or along the division of sapwood and heartwood. Strike with the club. Once the blade is in, rotate the handle downwards. One may have to strike the protruding blade again but usually the cleft opens and the froe is simply slid downwards. With tough wood I sometimes hold the split open by placing a stick into the wide end of the cleft. If the cleft starts to run out (divide unevenly to one side) rotate the piece 180° and continue to work from the other side. For thinner pieces, subdivide each bolt in half until you reach the required thickness. Attempts to cleave into uneven pieces, such as thirds, will usually fail. One can sometimes save a wild split by reversing the wood and starting again from the other end. The splits should meet, but it may be necessary to separate the two halves with a knife or hatchet.
Basket splints
White oak splints for basketry should be made promptly after the tree is felled. If this cannot be done, submerge the bole under water, but use as soon as possible. Five to six feet is about the maximum length for fine cleaving and weaving basketry. Cleave radial sections 1 in. to 2 in. wide. Split off the heartwood. Remove the bark with a drawknife, and shape to a square or rectangular cross section. Cleave in halves and quarters tangent to the annual rings. Once the wood is reduced to a thickness of about 1/2 in., it becomes possible to use a knife rather than the more awkward froe.


To start, work the knife across a corner of the end grain, or tap in with a light mallet. Twist (rotate) the knife to open the cleft. As soon as possible, insert both thumbs into the cleft and place the second joint of your index fingers externally just below the cleft. Begin to pull the splint apart by using successive knuckles as a fulcrum while pulling your thumbs away from each other. This process requires a “feel” that comes with practice. If the splint starts to run out on one side, pull down and harder on the other side. Sometimes the wood fibers must be pared with a knife to keep the splint running evenly.
Good white oak will cleave to less than 1/16-in. thickness. The splints may be smoothed with a spokeshave, scraper, or penknife. They are sorted and tied in bundles, and may be stored until needed.
Shingles

Shingles may be split from conifers (especially cedar, redwood, and some pines) or hardwoods (generally red oaks). The tree diameter can be as little as 12in., but 24 in. or more is much better. In any case, the wood must be straight-grained and free of knots and other imperfections. First crosscut into bolts of desired length, usually 18 in. to 24 in. There are several methods of proceeding. Swiss shingle makers often use fine-grained 12-in. pines. They halve and quarter the bolts, then split off the heartwood and thin pie-shaped segments on the sides to form a square bolt, which is usually split into halves, quarters, and eighths.
With a larger hardwood bolt, the circumference can be divided into equal segments (3-½ in. is excellent), then split into halves, quarters, and then the smaller sections. Any wavy or twisted heartwood is discarded. If the resulting segment is more than 5 in. wide, it is split in half. Each squarish section is split into 16 shingles.
In either case, the individual shingles are split across the annual rings. Parallel split shingles will warp unacceptably. Place the froe in the exact center of each segment or it will run out, resulting in uneven shingles and too much waste. Most shingle makers use a brake to hold their wood in place, but in Switzerland a leather knee pad is used to hold the material against a knee-high bench. Most shingles need dressing out; curves and bumps must be smoothed before installation. Smoothing is usually done on a shaving horse, using a sharp drawknife. The shingles should be tied into very tight bundles (use a vise to press them together) if they are not installed immediately.

Sign up for eletters today and get the latest techniques and how-to from Fine Woodworking, plus special offers.


