Designing Patterns on Laminated Bowls
[Originally from FWW Issue #13]
Bowls can be turned from seasoned wood, green wood, or laminated wood. The results from seasoned or unseasoned stock are similar, but the bowls produced from laminated wood are quite different. I wanted to turn some bowls, but since I don’t have a chainsaw or a drying room, using green wood seemed beyond my capability. And I couldn’t afford to purchase a large slab of seasoned hardwood either. Therefore, I turned to making bowls from glued-up wood. When I began, I did not know what form my laminations would take; the laminated bowls I had seen didn’t seem especially attractive. So I decided not to look at any how-to literature and just try it on my own. The four bowls shown here are the results of my experiments.
If I could have turned bowls from solid stock, I don’t know if I ever would have tried this type of lamination. But now I am hooked on the idea. The field of complex laminations is new and unexplored. Haphazard gluing can be unattractive, but with some creative thinking, the laminations can enhance the beauty of the wood. Glue lines may not be pretty, but they are no uglier than the mortar that holds bricks together. If a bricklayer makes an elegant archway, he must taper his bricks; to do s,o he increases the mortar-to-brick ratio. The same is true for the woodworker. If he wants to achieve a bend or design through lamination, the glue-to-wood ratio will increase. Both cases are legitimate uses of materials, and neither should be criticized for its use of adhesives. The work should be judged by the finished product.
My first bowl started with a simple idea: I wanted to change the usual horizontal glue lines of a laminated bowl. I accomplished this with some risky end-grain gluing. I glued together pieces of cherry, oak, mahogany, and teak. This block was clamped to the miter gauge of the table saw for safety and accuracy. Then two careful 45° crosscuts caused a 90° chunk (a right triangular prism) to be released from the end grain, as shown in the drawing.
This cut had to be carefully done because any unevenness would result in a poor and potentially weak glue line. The 90° must be precise too—it is easy to check with an accurate try square. From the other end of the block, I cut the same shape, only here the grain is at a 45° angle to the hypotenuse instead of perpendicular. This cut, because of its length, must be done on the bandsaw. It will not be a glue surface, so its flatness is of no special importance. This same end is then cut square for clamping. Because of the end grain, I sized the surfaces with a liberal coat of plastic resin glue. After it soaked and dried a little, I applied some more and clamped it. The clamping procedure is very easy-two clamps will do the trick-then it’s on to the lathe.
Next, I decided to pass thin sheets of mahogany through a laminated block of cherry wood. On the table saw, I set the miter gauge and the saw blade for a compound angle cut. In between the two halves, I sandwiched mahogany veneer. After it dried, I repeated the process two more times. In the end, each piece of mahogany intersected the other two, as shown in the sketch. When the blank was turned on the lathe, the mahogany became hyperboloids. The most interesting parts proved to be the intersections of these hyperbolas.
Gluing this bowl turned out to be harder than I had expected. The angle cuts, under pressure of clamping, caused the two halves to slip apart. I solved this problem with some awkward clamping from all six sides. The unorthodox cross grain gluing might lead to the eventual destruction of the bowl. But the thin veneers of mahogany might not have the strength to break the glue joint, just as thin layers of plywood survive their cross-grain gluing. Time will tell.
The gluing problem I encountered in the previous bowl gave me an idea for the next one. It also sent me from the table saw to the bandsaw. So far, I was making straight cuts, and the lathe was changing them into curves. This time, I decided to cut a curve. I started with a block made of cherry, oak, mahogany, and walnut. Through this, I cut (vertically) a gentle arc. In between this arc, I placed thin strips of walnut and cherry. The work was first clamped together dry to find the gaps. Then I removed high points on the spindle sander.
The final gluing was easy to do. The problem of slipping I had experienced with the previous bowl was gone, because the two arcs aligned themselves naturally. Bending wood can be difficult and time-consuming: The bending jig must be made to duplicate the curve, and steam is needed to achieve the bend. But here the bending jig is no extra work since it is also the finished bowl, while the thin laminations form easily to the arc without steam.
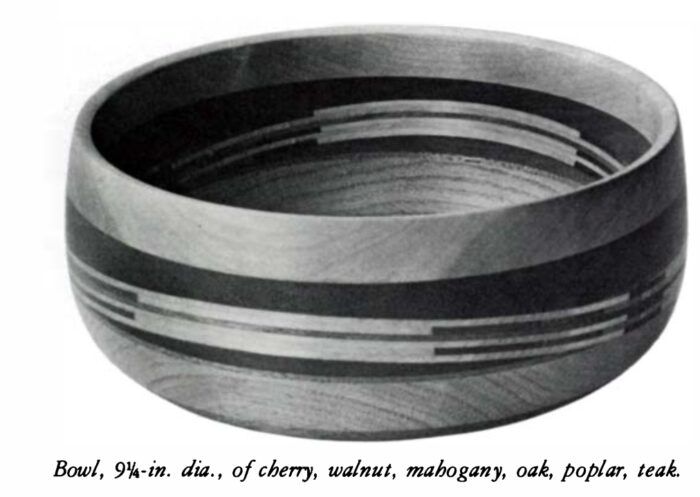
For the last bowl in this series, I started with the same block as before. But this time, the arc cut through the block went along the horizontal plane. The veneer to be laminated in this space also had to be glued up. I glued strips of stake, poplar, oak, cherry, and walnut, all 3/4 in. by 2 in., together edge to edge. They were resawn on the bandsaw with the fence set at 3/16 in. A sharp blade is needed for this cut, or else the blade will wander. The sheets were passed through the planer to bring their thickness down to ⅛ in. and to remove the saw marks, thus ensuring a good glue joint. They were turned left over right, and at the end grain an inlay pattern appeared.
Again, this block was clamped dry to find the gaps that had to be sanded away. Once glued and turned, the curved laminations in the center of the bowl became a continuous wave around the bowl.
Fine Woodworking Recommended Products

CrushGrind Pepper Mill Mechanism
Matt Monaco designs his pepper mills to accept the CrushGrind mill mechanism, which he likes because it doesn’t require drilling through the top of the mill’s cap and having hardware exposed on top.
Sign up for eletters today and get the latest techniques and how-to from Fine Woodworking, plus special offers.
Download FREE PDF
when you enter your email address below.


