How to create a lipped inset lid for a simple box

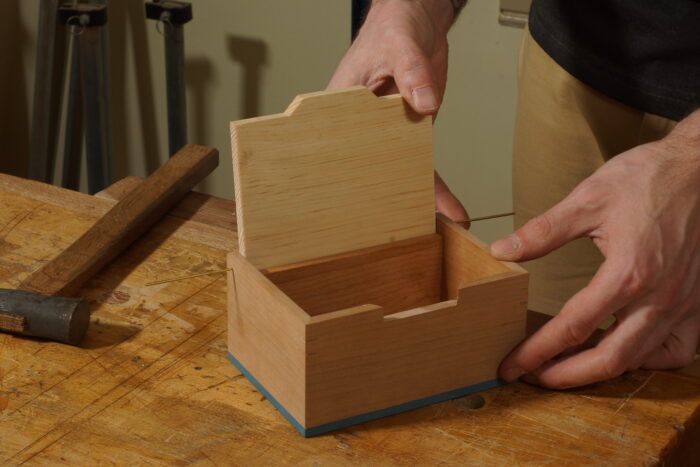
Of all the ways to top a box, I have two favorites at the moment. Both, fortunately, self-register the lid without costly hinges (and cheap ones are best left for shop projects). The first method is a wicked smart rabbet that you start before sawing the miters. The second, simpler one is the one I used on my box in “Make a Box with a Built-in Hinge” in FWW 303. This lid has a tab in front that slightly overhangs a notch in the box front. The box’s the lowered, inset back acts as a stop and allows the lid to sit in the notch. Done right, flicking the lid open and shut is nicely satisfying. The box was originally intended as a salt cellar, so it’s meant to open effortlessly while you’re busy cooking. Turns out it’s fun to fidget with too.
For a sweet fit, you’ll make the lipped lid, trace it to the glued-up box, and cut the notch. The router table was my best friend here, since I could employ some special bits to make cutting the lip and notch much easier and cleaner. (For those who’ve been tuned in to my previous blog on this box, this process is an updated version of that. Both methods work, but forming the lid first, as I do here, is for sure an improvement.)
The bit for the lid’s a 45° flat-bottom V-groove bit with a 1/2-in. shank. I wanted the tab to be centered, so I flipped the workpiece between passes while feeding it face first into the bit. The process is fairly simple: cut with each end against the fence, tap the fence away a bit, and cut both ends again. Repeat until the lip’s the width you want. Because this bit has cutters across its flat top that angles down the face at 45 deg., it forms a perfect notch.
There are two safety concerns, however. First, bury the bit into a zero-clearance fence to start. If you have a split fence, this closes up what would be the wide, unsafe gap needed for the wide bit. The lid’s thin, so it’d have plenty of chance to slip into the opening.


Second for safety, use a substantial backer block. It’ll also absorb blowout with each cut.


I have one step before tracing the lid, which is still slightly overly wide and long at this point. I shoot each end to fit the box opening, which is glued up by now, while keeping the table centered as best I can. I’m taking off shavings, so it’s hard to make the lid wildly unsymmetrical. If the box isn’t square, I trim the ends to fit the angle. I plane the lid to width just before installation.
Now, trace the lid and mark the depth of the notch.


You’ll rout the notch to final shape with an 1/8-in.-long pattern bit, which means sawing its ends and most of the waste between first. There’s not much room to operate, so be careful as you work. Saw the ends of the notch, then cope out the waste.

When you rout the waste, take baby-size nibbles. For one, it’ll prevent blowout on the inside of the box. But it’ll also keep you safe, since feed direction’s a little complex up and down the notch’s angled ends. The less material you remove on each pass, the safer you’ll be.
As you near your layout line, put the lid in place to check the notch’s bottom and box’s back are in the same plane. You can also monitor the bit height against the back’s top edge, but again verify the setting with the lid in the notch.
With the notch at final depth, refine its ends so they run parallel with the lid’s notch. I like sticky-backed sandpaper adhered to the fancy of wooden a wooden strip. For gross changes, consider a chisel and plenty of care.

When the notch is done, check to see how much the lid overhangs the back at each end. Plane it to fit, noting any angle if the box isn’t square.

The box uses two short lengths of brass rod as hinges, which are located so the box’s back acts as a stop. I don’t see why standard barrel hinges wouldn’t work just as well too.
Sign up for eletters today and get the latest techniques and how-to from Fine Woodworking, plus special offers.


