How to Photograph Your Furniture
There’s no arguing the value of professional-quality photographs of your work, whether you want them for marketing, social media, your own record, or perhaps the Fine Woodworking Gallery. However, the cost can be prohibitive, and scheduling a shoot for the crunch time before you deliver a piece can be a challenge. That’s assuming there’s even a suitable photographer in your area. In this article, I’ll show you how to document your own work without a studio or elaborate photographic gear—in fact, with little more than a quality smartphone camera and natural light. To illustrate the advice in the article, I took photos in places ranging from a basement room to a loading dock. And although before becoming a full-time furniture maker I was a professional photographer and still own a high-end digital camera, I took all the finished shots with my iPhone. I did some minor color and brightness adjustments but no deep Photoshop work.
There must be light
The first thing you need for a photograph is light, and in most cases natural daylight will get the job done nicely. Ideally, it will be diffuse or indirect. Direct sunlight is high contrast and will cause your photos to lose detail in their highlights or shadows or both. The light from a north-facing window (or south-facing in the southern hemisphere) is ideal, since the sun will never shine directly through it. The light from it is always reflected, thereby more dispersed and consistent. But in the absence of a north-facing window, there are simple ways to diffuse direct sunlight to achieve a similar effect.
Sometimes you’ll want to use artificial light to supplement daylight or to light a whole scene. It’s important, though, to avoid mixing different light sources. All light has a color temperature (measured in degrees Kelvin), and different color temperatures produce different color casts. This is what labels like “daylight” and “warm white” on light-bulb packages are referring to. Our eyes are good at evening out mixed color casts, but camera sensors are not. You may not notice a problem until you see an ugly green or magenta hue in parts of your final image. This is hard to remove, so when using daylight, turn off the overhead shop lights. And if you augment daylight with artificial light, be sure the bulbs are daylight balanced. Less light is better than mixed light.
Modifiers
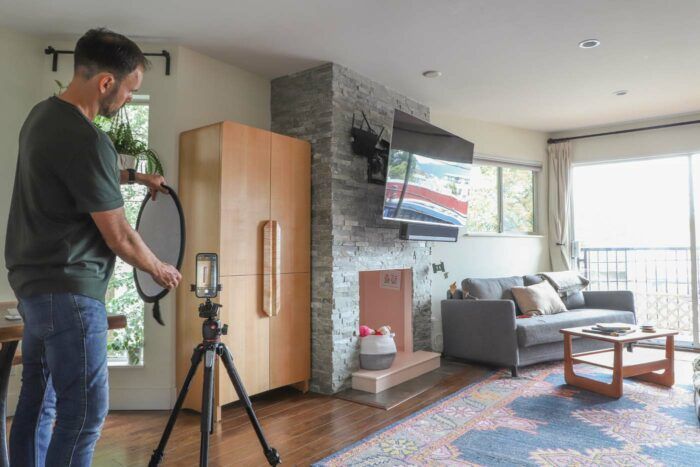
There are three primary ways to modify your light source: gobos, bounces, and diffusers. A gobo blocks light; it is preferably black so that it doesn’t inadvertently bounce light where you don’t want it. It can be used to cut the light hitting part of your subject, or to cast shadows on a boring background to create a little visual interest. A moving blanket works well as a gobo.
A bounce does exactly what its name implies: It reflects your light source, enabling you to direct light into shadow areas. The goal of a bounce is not to eliminate shadows, but to retain detail in them. Foamcore, white-painted MDF, a mirror, or a piece of aluminum foil will do the trick. The shinier the bounce, the harder that reflected light will be.
Diffusers soften light that is too harsh and direct. Film and photography suppliers sell sheets of plastic diffusion, but a white bedsheet or a sheer curtain will also work. If there is any color to the diffusion material, however, it will be cast onto your subject.
If you don’t have access to a suitable daylight source, you can mimic it with an artificial light plus a bounce. Shine the light away from your subject and toward a white surface—a bounce or a wall.
The camera
Next is a device to capture that light: a camera or a smartphone. A digital camera with manual settings and interchangeable lenses will give you more control, but most mid- to high-end smartphones can take pictures that appear indistinguishable in quality from those taken with digital cameras, especially when you’re scrolling through them on Instagram. The camera in your phone may not come with manual controls, but there are camera apps that provide greater control and additional features over a phone’s native app. I think ProCam for iPhone (about $10) is an excellent option, especially for those with photography experience.
Smartphone lenses tend to be wide angle, which will distort the straight lines of your piece. To avoid distortion and match more closely what the eye sees, move your camera away from the subject and zoom in x2. Cameras with optical zoom have lenses that move to change the focal length of the lens, while digital zoom is basically the same as cropping in on an image. Both help with distortion, but the latter degrades the resolution of the image. That said, a x2 digital zoom should still produce photos of acceptable quality.
The tripod
Arguably as important as the camera you use is your way of keeping it stationary. Shooting photos handheld is fine if you’re playing paparazzi to your energetic toddler, but your furniture doesn’t mind sitting still. Take advantage of that and find a way to keep your camera in one place. A quality tripod is the best option, and if you have $250 to invest in camera equipment, I advise you to spend it here. Avoiding camera shake is vital for shooting with long shutter speeds, which can enable you to take good shots even when the naked eye says the scene is underlit. The tripod also lets you concentrate on the details of the shot and make subtle changes to it without moving the camera.
Tripod mounts for smartphones are available online for under $30. Some also come with table-top tripods for small-scale work. In the absence of a tripod, get creative. After all, you have a shop full of clamps. I’ve used an A-clamp, one handle mounted in a hand screw, to hold my phone for benchtop videos.
On location
Now you need a photo studio. The top priority is to find a room with lots of natural light, but there are other factors to consider. You need enough space to maneuver your piece into position. You also need clearance to move your camera far enough away that you can zoom in and avoid the distortion of a wide angle lens. And you need enough room to keep light modifiers out of frame.
Then there’s the question of background. A room setting with other furnishings can make for an excellent photo, giving your piece a welcome sense of scale and use. Turn off mixed light sources, and try to remove distractions. Look for props that you can dress the piece with to make it look like it belongs.
Another approach is to use your shop or other industrial space as a background to give your work a unique sense of place. Look for a background with interesting texture, perhaps a tidy tool wall, but limit distractions. If you have enough room, you might set the piece far from the background, and then while focusing on your subject let the background fall out of focus.
To eliminate the distractions that a room setting can bring, you can shoot your piece on a seamless—a roll of heavyweight paper that is usually 50 ft. in length but comes in various widths. Choose a width roughly twice that of your subject. The roll is mounted high on a pipe and unrolled until it sweeps under the subject, isolating it from the floor and the background. Try to keep the seamless clean and free from creases, which will create distracting shadows. This is easier said than done, which is why rolls are 50 ft. long; used seamless can be cut off and fresh seamless unrolled. When using a seamless, roughly work out the position of your piece and the lighting prior to sweeping the seamless underneath so you avoid unnecessary damage, and wear shoes you can slip on and off. With the seamless in place, clamp the end of the pipe to keep more paper from unspooling.
On the shoot
When it’s time to shoot, place your subject in front of the light source, moving and turning it to see how the light plays on its surfaces. Try angling the piece 45° or so to the light source. That creates raking light, which will produce shadows that define surface details and the gradients that emphasize curves. Without those shadows, the piece may look two-dimensional. The goal isn’t necessarily to light the entire piece. Shadows are as important as highlights in communicating its shape. Similarly, angle the camera position to the piece to create a sense of depth; it’s generally best to avoid shooting straight on.
Next, explore your subject with your camera in hand. This step is akin to roughly sketching a design. Try out different angles, thinking about the elements you want to capture. A shot list prepared in advance can be very helpful. When you’re satisfied with your “sketches,” it’s time to mount your camera to your tripod. With each new angle, take test shots and review them. How is the composition? Are you leaving enough space around the subject to allow for cropping to fit Instagram, etc.? How is the exposure? Are the highlights blown out or the shadows devoid of detail? Are any lighting modifications needed? How is your focus? Is there anything distracting in frame that can be cleaned or removed?
Whether your piece is heading to a client’s home or your own, it’s important to take your time and give yourself plenty of options. As you gain experience with your camera, lighting, and the look you’re going for, you’ll refine your process and figure out which options you need and which you don’t.
One last item to consider: If you’re not a wiz at Photoshop and would like help with editing your photos, consider outsourcing that task. Unlike photographers, photo editors can work online and at a distance, and scheduling is less of a concern. If you provide quality source images, you’ll save the editor time and save yourself money.
Jon Wayne Brown builds custom furniture in Vancouver, B.C., Canada.
Sign up for eletters today and get the latest techniques and how-to from Fine Woodworking, plus special offers.


