Offset Knife Hinges for Inset Doors
In my article in #318, on pp. 46–53, I show how to install straight knife hinges, which are used with overlay doors. Here, I’ll explain everything else you need to know to install the offset type of knife hinges, which are used for inset doors. There are a few extra steps involved, but the process isn’t any more difficult. I’ll be skipping over some of the steps described in the main article, so be sure to read that one carefully before working your way through this one.
|
|
|
To install these hinges, you’ll need your case built and dry-fit, but not glued up, because you’ll assemble and disassemble it during the hinge-mortising process. Have your door built as well. Make it oversized by 1/8 in. or so in width and height. If the case ends up at all out of square, you’ll need extra door material for successful fitting.
Template has an L-shaped opening
The template approach I demonstrate in the main article works just as well for these L-shaped offset hinges, though the template includes a few more parts. Also, because of the L-shaped hinge mortises, the template must be flipped over to rout mortises in both ends of the door. Because of that, it has a fence groove on both faces.
You can also use the same pattern-routing bit I used in the main article—Amana’s No. 45475 3/8-in.-dia. flush-trim bit—which has a slight offset between the bearing and cutters. This needs to be factored in when you’re cutting the parts for the template. A set of dial calipers is indispensable for fine-tuning the fit.
After cutting a test mortise with the template, cut the shallow grooves for mounting the fence. Then form a tongue on the fence that fits the slot, and drill and countersink screw holes as before.
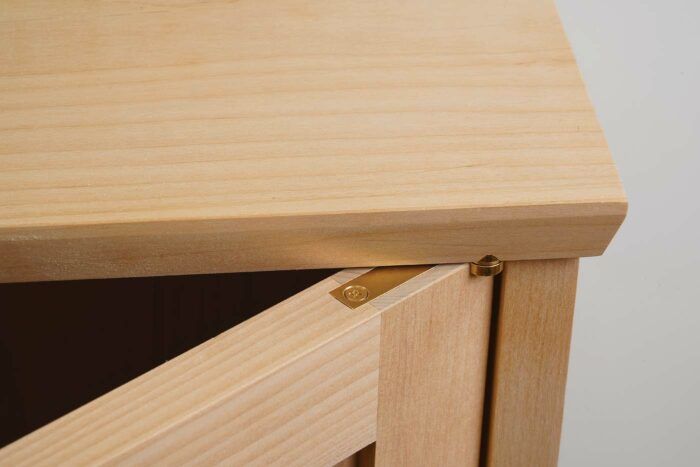
Note that the long part of the hinge might not end up centered on the door’s thickness this time. What matters is that the pivot point of the hinge is centered on the front edge of the door. This will ensure that the door functions properly without binding.
Template for Accurate Mortises
This template is a little more complex than the one for straight hinges. You’ll be cutting two strips out of your template board, and crosscutting and aligning those to create the L-shaped opening needed here.
|
|
|
Make a setup block for case mortises

|
|
|
|
|
|
 |
 |
As with the straight hinges, you’ll install the case parts of these hinges first. And you’ll use a similar method to lay out the hinge locations.
Again, you’ll need to dry-fit the case and make a setup block the same thickness as the door. Cut hinge mortises at both ends of the block, with the template’s fence referenced off the same face for each one. You’ll need to switch the fence to the other face of the template to cut the second mortise.
Use the block to position one leaf of each hinge properly on the top and bottom of the case, using double-stick tape. Mark around each leaf to record its position, and you are ready to cut the case mortises. As before, the fence comes off here—to allow the template to reach the mortise locations—and you’ll align it with your pencil lines the same way.

Glue up the case and fit the door
When you are happy with how the hinges fit into the case, you can glue it up. When fitting the door to the case opening, go for a 1/32-in. gap on the top, bottom, and hinge edges (but not the latch edge just yet). Start by trimming the door until it just barely fits into the opening. A crosscut sled or track saw works well here. As you trim the bottom edge, make sure the hinge side of the door lines up parallel with the hinge side of the case. Next, with the door sitting in the case on its bottom edge, mark the top edge, then trim it. The hinges have a built-in washer that creates a 1/32-in. gap between the door and the case, so if you trim 1/16 in. from the top edge at this point, you’ll get the desired 1/32-in. gap above and below the door, once it is resting on the hinges. Leave the latch side of the door untrimmed and tight at this point.
Cut the door mortises and hang the door

|
|
|
You’re ready to cut the hinge mortises in the door. The fence goes back on for this step—first on one face of the template, then the other. Once the hinge mortises are routed, their corners are squared, and pilot holes are drilled, you can hang the door. Then mark the latch side of the door for that same 1/32-in. gap, and plane it for a perfect fit.
I hope this encourages you to use knife hinges, which offer unmatched looks and performance. The template approach eliminates the difficulty and risk usually associated with these elegant hinges, leaving you to enjoy all of their benefits.
Fine Woodworking Recommended Products

Jorgensen 6 inch Bar Clamp Set, 4 Pack
Small light-duty clamps are best bought in quantity. These clamps are a great balance of affordability and quality—so stock up!

Rockler Deluxe Panel Clamp
These clamps can handle glue-ups between 10 in. and 36 in. wide, and boards up to 3 in. thick. Sliding feet attach to the lower bars with magnets, letting you position them quickly for stability on any surface. The spring-loaded jaws adjust easily, dropping into notches along the bars. And the powerful clamp handles clear the benchtop.

Bessey K-Body Parallel-Jaw Clamp
The 3 3/4″ deep parallel jaws allow for all types of clamping, from thin panels to joinery.
Sign up for eletters today and get the latest techniques and how-to from Fine Woodworking, plus special offers.
Download FREE PDF
when you enter your email address below.


