Techniques for Curved Molding – FineWoodworking
Synopsis: A cockbead is a small molding with a fully rounded edge. In this article, Chuck Bender gives step-by-step instructions for creating cockbeading and applying it to the cutout apron of a William and Mary case piece. After being cut, pieces of cockbeading are submerged in water with a little added glycerin to ehance their pliability. They are then secured to the apron with hide glue and rose-head nails. Some pieces are cut to final dimensions before being applied, while others are cut in place.

They say it’s the little things in life that matter most. To me, that’s another way of saying life is all about the details. I look at furniture the same way—the details make all the difference. Those details can be in the form of a carefully placed chamfer or quirk, or a delicate molding that highlights the architectural nature of a piece. In William and Mary furniture, the details often take the form of a bent cockbead that follows the scrollwork cutouts of case sides and aprons. The more attention you pay to the small details throughout the process, the better your finished product will look. It’s those little details that take your piece from good to great, from acceptable to masterpiece.
Furniture of the William and Mary period moved away from using straight-grained boards for case construction. Instead, it had a lighter, more flamboyant look. Highly figured veneers were broadly used. Because the pieces were covered in burl and crotch veneers, furniture makers soon discovered the need to protect the edges of the delicate veneer with a cockbead.
A cockbead is a small molding, approximately 1/8 in. thick, with the edge fully rounded over, forming a half-round. The half-round usually projects slightly beyond the surface of the part to which it is applied. On veneered drawer fronts, the cockbead is typically set into a rabbet. When applied to the apron or sides of a William and Mary case piece like the one shown here, the cockbead is applied directly to the cutout surface.
Create the molding first
Making a cockbead for a curved surface isn’t much different from creating one for a straight surface. I used a router bit to form the bullnose, or half-round edge, but you could use a molding plane. If I’m only making a small section of cockbeading, I might simply use a block plane and sandpaper.
For me, the process starts with material 1/8 in. thicker than the wood to which the cockbead will be attached. If you’re attaching the molding to a case side that is 7/8 in. thick, then the board for the cockbeading needs to be 1 in. thick. The board should also be at least 50% longer than the longest piece of beading needed. You need material to hold onto when making the bends. And you also need extra length in case it splits at the nail(s) during the bend. The extra length allows you to cut the bead back and reinstall rather than trashing the piece and starting over.
 |
 |
Once the board is milled, pass a hand plane over the edge to remove any machine marks. Typically I use my scrub plane on stock I’m using for curved cockbeading because it gives the surface a texture that mimics what you find on William and Mary furniture. On period beading, you often see tearout and concave plane marks, similar to what you see on interior surfaces of furniture of the period.
I use a Whiteside #3240 1/8-in. bead-cutting router bit set up in a router table to cut a quirk into the face of the board. Next I head to the table saw and rip off the freshly made cockbead, then hand plane the edge of the board. I repeat these steps until I have at least 30% more cockbeading stock than I think I need.
Pliability is the key to success
With the cockbeading made, it’s time to make it supple so it will bend to the will of the curves. Unless you’re using green wood, you need to introduce some moisture to the beading. I submerge the strips in a large bucket or container filled with warm water. I add a little glycerin to the water, approximately 2 oz. per gallon, for added flexibility. Often I tie the beading into bundles, then weigh the bundles down in the container to keep them fully submerged.
 |
 |
At a minimum, keep the beading submerged overnight, but try not to keep it in the water for more than a day or so at a time. The idea is to soften the fibers without creating material that has expanded greatly because of the added water. The last thing you want is abundant shrinkage after the beading has been applied to the piece of furniture. Once you can bend a piece beyond 90° by hand without fracturing or breaking, you’re ready to begin.
Prepare the glue and nails
Before you install the beading to the case, get the glue and the nails ready. Typically I mix a batch of hide glue a day in advance, then get it cooking in the pot several hours ahead of installation to ensure that all the crystals fully dissolve.

Historically, rose-head nails held the beading in place while the hide glue dried. Reproduction nails are fine, but they may pull out of the work under the stress from the bent beading material. I soak my reproduction rose-head nails in muriatic acid overnight, then spread them out on a flat surface to rust a little prior to use. The thin coating of rust gives the nail shanks a bit more bite.


Create two workstations
To be efficient, set up your work area with two stations. The cutting station should have the container with the beading still submerged in the water, a sharp chisel (wider is better), a paring block if you choose to use one, or a backer board if you go freehand.
The application station should have the glue pot, the piece to which you’ll apply the beading, a hammer, nails, a drill with the proper bit, and a heat gun (already running and hot). I also include end or diagonal cutters for nail removal when everything just goes wrong. It is also a good idea to have a few clamps nearby.
Start with a miter
The beading goes on in sections, with the pieces left long at first. The first piece should go in an inside corner, where miters meet.I try to plan the application of the beading in an order that allows me to run the beading long and make final cuts after installation. Typically I start on inside corners, where miters meet. Because the beading has been softened, miters are easily cut with a chisel, either freehand or with a paring block.
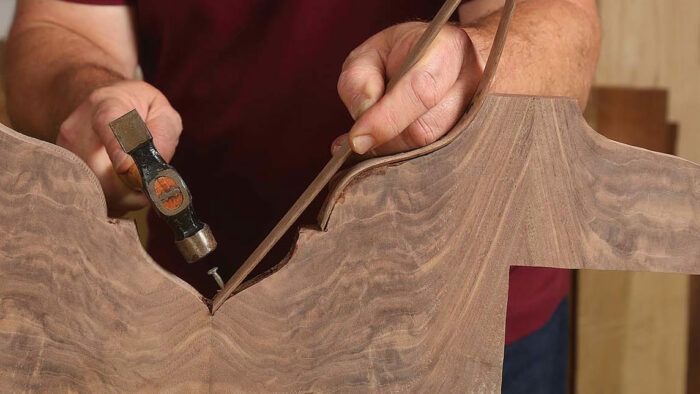
Remove a piece of beading material from the water bath and cut the first miter with the chisel. Spread glue on the curved surface of the case and a little on the back (sawn) side of the beading. Hold the beading in place and drill the pilot hole about 1/2 in. away from the end. Nail the beading in place.
|
|
|


Bring on the heat

At this point you should have a piece of pliable beading with one nail holding it in place on the substrate you are adhering to. That means it’s time to start heating the beading and pressuring it into its curved place. In one hand, hold the heat gun a few inches from the beading. Keep it moving, because you don’t want to scorch or burn the wood. While applying a fair amount of downward pressure to the beading with the other hand, start the bend. Period pieces often have far more nails in the beading than you would think necessary, often every 1/2 in. or so. I tend to be a little more reserved with my nails and to place them every 1 to 2 in., depending on how well the beading maintains contact with the substrate.
Again, I tend to let the beading run long of the ends of the curved sections; if there’s a flat section, or fillet, dividing two curved sections, that’s usually a necessity. If both ends of a bead will be mitered, I seldom cut the piece to final length until after the glue has set. It’s always easier, and more accurate, to cut the beading to final size afterward. If the end of the beading is square, definitely let it run wild and then cut it off flush after the glue has dried.

Subsequent pieces
Getting all the beading in place is a strategic juggle. It’s ideal to let pieces run long until after attachment. Some pieces will get mitered before installation, and some will have to be mitered once they are glued in place. For best results, try to map out your order before you start attaching.
|
|
|
Pare the miter to the final size, working from the outside (the beaded side) toward the inside of the apron in case you have any blowout.
 |
 |
Some pieces can be mitered on both ends before installing. Cut a miter on the end of a stick of beading, then hold it in place, mark the length, and miter the second end. Add a bit of hot hide glue and put the beading in place, clamping it if necessary.

You may occasionally find it necessary to put a clamp or two in spots where gaps form. Ideally this is done during the bending process, but you can also apply clamps after the beading has set. Use a heat gun to warm the beading, which in turn will soften the glue. Add a clamp until you see a little squeeze-out, then let it set. Allow the completed beading to dry out for a few days (or even longer) before you do the final surface prep and apply finish.
-Chuck Bender is a woodworker and teacher in Jim Thorpe, Pa.
To view the entire article, please click the View PDF button below.
Fine Woodworking Recommended Products

Bahco 6-Inch Card Scraper
The size and thickness are what matter here. A consistent performer, this Bahco scraper is found in many shops we visit.

Whiteside 9500 Solid Brass Router Inlay Router Bit Set
Set includes solid carbide down-cut spiral bit (for chip-free cutting), quick-change bushing, template guide and complete instructions. Fits Porter-Cable, Black & Decker and any router with a Porter-Cable bushing adapter.
Sign up for eletters today and get the latest techniques and how-to from Fine Woodworking, plus special offers.
Download FREE PDF
when you enter your email address below.


