Bandsaw strategies for safe, straight cuts in solid stock

Synopsis: If you’re using the bandsaw just for rough cuts and curves, you’re missing out on something. This machine is perfect for ripping solid wood, from breaking down stock to near-finish cuts. It’s quieter and safer than a table saw, and Tony O’Malley argues it’s also more comfortable to use. Here he covers the basics of setting up and using the bandsaw for all your ripping needs.
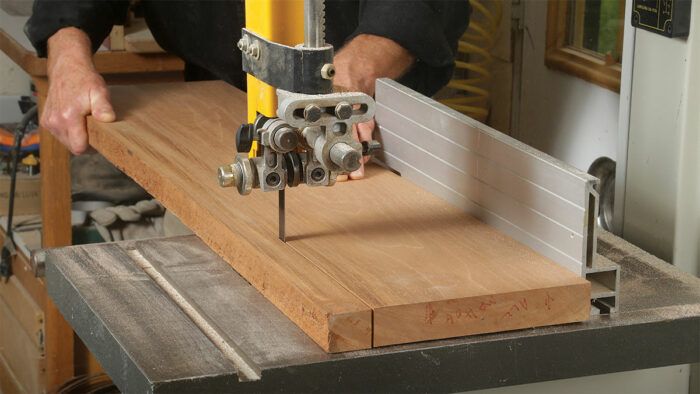
Bandsaws come with a fence for a reason: They aren’t just for curves and rough cuts. Indeed, they can make quality, accurate rips as well. Provided you have a good saw that’s set up and equipped with the right blade, you can stick with this safe, efficient machine from stock breakdown to near finish cuts. The only limit is your bandsaw’s rip capacity. Because bandsaw tables are small, infeed and outfeed supports are helpful.
While I’d never give up my table saw, the bandsaw is the better way to go for ripping solid wood in my shop. For one, it is quieter and much safer. You will never experience kickback on one. It also wastes less wood because its kerf is about half that of a table saw’s. And last, I find that working at a bandsaw is just more comfortable.
Rip wide to give the wood room to move
I work with kiln-dried, roughsawn lumber from one of several trusted local mills. Even though the wood has been dried well, I still anticipate some movement when I rip boards into narrower pieces. This is where the bandsaw’s safety advantage shines the most, because there’s no possibility of kickback when tension in the wood is relieved and the wood binds against the blade. You can always just keep pushing the workpiece through the cut.
To begin, I joint one edge of a rough board, then set the fence on the bandsaw and rip my pieces 1⁄8 in. to 1⁄4 in. over their final width. If the edge is very irregular, like a natural edge, I first mark a straight line and bandsaw to the line before jointing that edge. The longer the part, the more extra width I leave in case the part develops crook—a curve along the edge—which is common. There’s no need to joint between rips at this stage. I then give the rough-ripped parts a day to settle before continuing to mill them. I stack the pieces on edge with space between to allow air to circulate.
Once the wood has acclimated, I continue milling it to final size. I start by jointing a face. If there is any bow, I joint the concave face for safety and practicality, then plane to final thickness. Next, I joint one edge, again choosing any concave edge. With both faces planed, I can edge-joint with either face against the jointer’s fence.
Second rip is just shy of final width
At this stage, people often turn to the table saw and rip the board to width. I stick with the bandsaw, but with an assist from the planer—or if need be, the jointer—in the next step. The bandsaw’s benefits still stand for this end-stage ripping, but the bandsawn edge will need cleanup and refining. So I rip my finished parts 1/16 in. to 1/8 in. wider than final width, again depending on the part’s length. If I’m ripping thinner strips from a wider board, I rejoint a reference edge between passes. The result is multiple pieces of the same width, with one edge jointed and the other edge bandsawn.
Rip wide, then wait


Joint and plane

Bring to final width


On wide boards, joint a second edge

Plane (or joint) to width
This may sound surprising, but I run my parts through the planer on edge to size them to final width. It works great provided there’s enough bearing surface on the tables. For thinner parts of the same width, I group multiples and pass them through the planer together, letting them act like one thick workpiece. For example, I would never try to run a single 3⁄4-in.-thick by 3-in.-wide piece on edge through the planer. The piece is too likely to tip, and the planed edge probably won’t come out square. But if I gang four pieces of the same width and hold them together as one larger block, they will stay vertical and their edges will be square. For longer stock, I set up infeed and outfeed roller stands to support the work.
When I need just one part or when the piece is too wide to plane on edge, I rip it on the bandsaw 1⁄16 in. wide and then joint the final edge. Be aware of your jointer’s depth of cut; don’t go past your desired dimension.
Jointing the edge may be another surprise. Returning to the jointer goes against common milling practice, but I think we should reconsider. For one, whether you rip with a bandsaw or table saw, that edge will have machine marks that need to be cleaned up. Some people do this with a handplane, but I argue that my jointer works just as well and is quicker. Plus, when are perfectly parallel edges crucial? Not with boards glued up for a tabletop, since you’ll bring the whole top to dimension, including making its outer, unglued edges parallel after gluing. Perhaps perfectly parallel edges are important for a floating raised panel in a larger door, but I believe that less than perfect is fine. Because floating panels need room to move, there is also room for slight variation in the width from one end to the other. While there is always the ideal to strive for, there is also acceptable reality.
—Tony O’Malley makes custom cabinetry in Emmaus, Pa.
Photos: Barry NM Dima.
Drawings: Vince Babak.
To view the entire article, please click the View PDF button below.
Sign up for eletters today and get the latest techniques and how-to from Fine Woodworking, plus special offers.
Download FREE PDF
when you enter your email address below.


