

Finish Line: Spot Staining and Topcoating Walnut
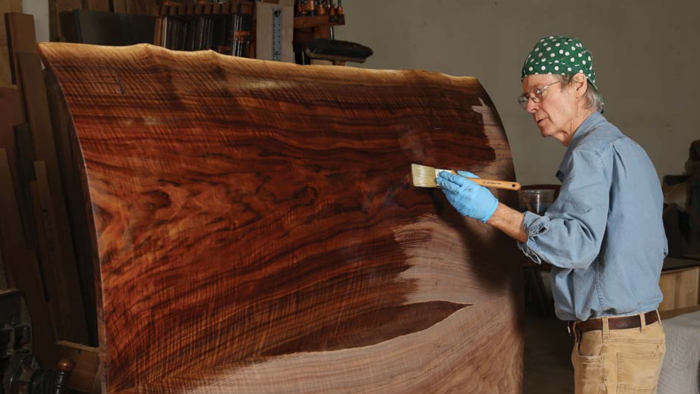
I rarely stain the furniture I create, generally preferring to let the natural color of the wood develop over time. However, recently I was making a large headboard using bookmatched planks of highly figured claro walnut (see “Free-Form Coopering,” FWW #321). The two planks were center matched and had a beautiful canoe-shaped area of sapwood in the middle, which I hoped to feature in the finished piece.
As the headboard came together, it became clear that there were two problems. First, the sapwood was too far off center and would be a distraction. Second, as I set up the bed and mocked up a structure representing the height of the mattress, I realized the sapwood wouldn’t be seen behind the pillows. So after all my efforts I was going to have an off-center, odd shape that would be partially hidden. What to do?

I reached into the wealth of knowledge imparted by my good friend Tom Hunt, a professional finisher for 30 years who taught me and many others his finishing secrets and approaches to sealing wood. (Sadly, he died of pancreatic cancer in 2018.) The solution, carefully matched spot stain, would significantly diminish my problems—with the bonus of emphasizing the tiger figure barely visible in the unstained sapwood.
I’m happy with the result. The color is better than I had hoped it would be, and the curly figure is emphasized. In addition, the off-center location of the sapwood no longer catches your eye. A couple attributes of the wood helped. Part of the beauty of claro walnut is the variation in its color and the strength of its grain patterns. In this case the color variation helped by deemphasizing the need for an exact color match, and the figure in the wood strengthened the connection of the stained area to the surrounding heartwood.
Color matching
The first hurdle was to test my collection of stains on similarly grained wood left over from the construction process. So I dug out scraps that had both sapwood and heartwood. From my collection of stains I selected all that seemed possible. After thoroughly stirring them and labeling each test area, I lightly applied them to sapwood that was adjacent to heartwood. Applying the various stains directly from the can lets me get an idea of whether I should dilute the stains and what the names mean visually. For example, what does “Special Dark Walnut” actually look like? Special to whom? Dark as opposed to almost black?
Before testing the stains, though, I applied a coat of clear varnish to the heartwood areas. That let me see the color I was trying to approximate as I applied the wet stain. Approximate is the right word. An exact match is impossible with the many shades of natural wood, so I aim for a close match. One of the beauties of stain is that you can build up multiple coats as long as a sealer (varnish, lacquer, shellac, etc.) isn’t applied between coats. Dark Walnut was too black/gray; Special Walnut was better but still too flat. On the other hand, Mahogany was warmer (more red). I mixed equal parts Special Walnut and Mahogany and tried again. I lucked out! Sometimes I have to make many samples to get what I’m looking for. The top finish will bring more light into the stained areas, so going a little dark with the stain won’t hurt.
Freehand application

Working on a vertical surface means there could be drips, so press blue tape underneath the section you’re staining to prevent dripping onto spots you don’t want stained. But don’t use tape to mask off the area you’re staining. The hard line created by taping off and painting to the tape will look unnatural and call attention to itself. Instead, paint the stain on with a small, softbristle brush. Once it’s dry, rub the stain out with a tack cloth.

A sampling of finishes
Color matching requires patience and experimentation. Testing stains on finished work is a disaster waiting to happen. I make a point of saving my scraps to test.

Experimenting with color
When trying to color match, seal the wood color you’re trying to mimic so you can see the color with finish on it. Then be prepared to test a lot of stains with various colors and ratios. In the end, I settled on an equal mix of Minwax’s Mahogany and Special Walnut.

Applying the stain
Now it was time to apply my Special Claro Walnut Sapwood stain. Although there can be a great temptation to carefully mask around an area that’s being stained, this is generally a mistake. Wood is a natural material, and straight lines like those that tape will produce rarely exist in nature, so I painted on the stain with a small 1/2-in. watercolor brush. I wasn’t striving to achieve a perfect matching edge, and if I had needed to I could have gone back and applied a bit more stain. In case some of the stain spread onto the heartwood or onto an area that was already good, I kept some paint thinner and a rag nearby. Wiping thoroughly with a heavily soaked cloth will lift out extra stain.
Clear coat
Having experimented with the stains and sealed the heartwood, I had a reasonable idea of how the entire piece would look when I applied the final finish. All the surface preparation was done before staining, so there was no need to sand the stained areas. Although stain penetrates the wood, sanding will change its density and thereby its color. It was important not to use thinner to clean the wood at this point. Even if the stain were very dry, it could have been dissolved, thereby changing the final color.

My preferred finish is satin varnish. It is not quick to apply but is very forgiving. I learned that some of the new thinners do not work with some varnishes when I tried to clean my favorite brush and the thinner would not dissolve the varnish.

I expected to apply five coats of finish. My objective was to show and feel the grain while still providing a strong protective finish. I was not looking for wood shown behind a glossy thick finish. Regardless of the claims, all finishes will show wear over time, and thick finishes are harder to remove.

After each coat except the final one, sand lightly, vacuum, and wipe the surface down with a tack cloth. With each coat use a finer grit of paper, working from 150 through 220.

After applying each coat except the last, I lightly sanded and vacuumed the piece thoroughly and went over everything with a tack rag. For the first coat, I thinned the varnish a minimum of 40% with paint thinner to allow the finish to penetrate the wood deeply and build up real protection. After the finish was completely dry, I sanded lightly with 150-grit paper and followed with a second coat of 30% thinned varnish. I sanded lightly again, this time with 180-grit paper, and I thinned the third coat of varnish just 15%. Before applying the fourth coat, thinned 10%, I sanded lightly with 220-grit paper.
As I applied the fourth coat, I checked it carefully. Had it been any thicker, I would have thinned the fifth coat 10% as well.

The magic of OZ


A few days after applying the final coat, I rubbed it out with 0000 steel wool and Mohawk’s OZ Wood Polish. OZ is sprayed on as both a lubricant and a sealer, then rubbed only enough to remove dust caught in the finish. I use OZ because it contains no silicone. Silicone may look good for a while, but it soaks into the finish and the wood. In the future if you refinish, silicone will cause fisheyes that no amount of rubbing or even belt sanding will stop. The only hope then is to flood the surface with denatured alcohol and light it. The fumes burn, not the wood.

-Rob Hare is a maker of things in Esopus, N.Y.
| From Fine Woodworking #324
To view the entire article, please click the View PDF button below. |
 |
Fine Woodworking Recommended Products
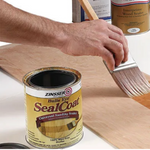
Zissner Seal Coat
Great as a sanding sealer, and as a final finish.
Foam Brushes
Foam brushes are great for applying a variety of stains and finishes, and the 2″ wide brush is the most versatile. Comes in a pack of 48.
Liberon Steel Wool
Perfect for rubbing out a finish for a low-luster sheen.
Sign up for eletters today and get the latest techniques and how-to from Fine Woodworking, plus special offers.
Download FREE PDF
when you enter your email address below.


