

Arts and Crafts Taboret – FineWoodworking
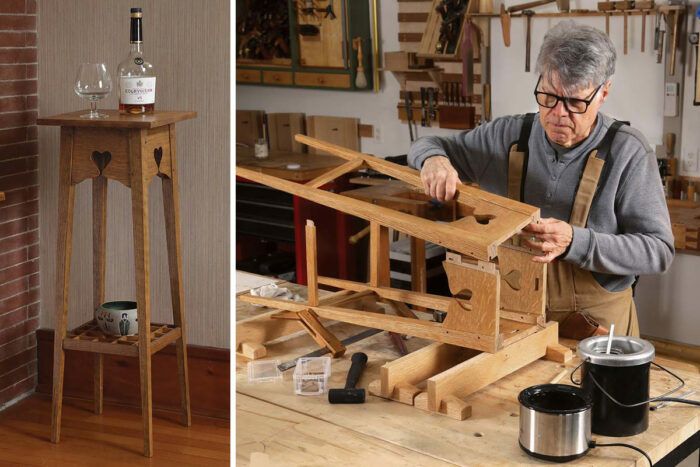
Synopsis: John Hartman’s Arts and Crafts–inspired taboret features tapered, splayed legs, an open grid shelf, pinned tenons, and quartersawn white oak. Hartman wanted to emphasize practical woodworking, so he adjusted joinery and dimensions during construction rather than strictly following drawings. After adding decorative cutouts and applying finish before assembly, he completed the taboret with a removable grid shelf and a top attached using traditional buttons that allow for seasonal wood movement.
Having just finished a lengthy bookcase project, I was in the mood to build a smaller piece of furniture. I began working on design options to show my partner, Christine, for our home. We wanted an original design that would complement our other Arts and Crafts–style pieces. Turning to our collection of books on the Arts and Crafts movement for inspiration, we found that we preferred the lighter forms of British makers rather than the often-boxy interpretations produced by many American builders.
I decided to design and build a taboret with thin, tapered legs that splay outward. We agreed that a solid shelf would look too heavy, so in keeping with the lighter theme, I designed an open grid shelf. The heart-shaped cutouts are inspired by Nancy Hiller’s article “Voysey Two-Heart Chair” (FWW #301). I incorporated other hallmarks of Arts and Crafts furniture, using quartersawn white oak and pinned tenons.
Building this piece was an exercise in separating what was essential from what was not, stripping away distractions, and focusing effort where it mattered most. For example, I wasn’t overly concerned with the precise angle or exact width of the leg tapers—only that all four legs match. I kept the legs about 2 in. overlong until the aprons were attached, which made it easy to trim the legs flush to the top of the aprons after assembly. And the joinery for the shelf stretchers was cut to match the actual span of the legs at dry assembly, rather than to the drawing’s dimensions.
Start with the legs

The legs are made from riftsawn 8/4 white oak. Using riftsawn wood here produces parallel grain lines, which look good and keep the legs straight. Adding a taper to the legs causes minor runout when cutting across the grain lines, but tapering only the inside faces hides that; the outside faces retain straight grain. I cut the taper on the table saw using a jig based on one designed by Steve Latta (see “Perfect Tapers on the Tablesaw,” FWW #229). Because the legs are long, I added a clamp toward the end for extra stability. I save the tapered offcuts, which are helpful for machining the leg mortises, and I mill them later into shelf stretchers and grid bars. Once all tapers are cut, I mark the tops with cabinetmakers’ triangles to maintain orientation and avoid accidentally cutting joinery into a show face.
Using a story stick, I lay out the apron joinery on the legs—the two mortises and the stub-tenon groove—and cut the joints with the hollow-chisel mortiser. The legs are splayed 3° as well as tapered, and the shoulders of the mortises must be angled to match. To achieve the correct angle in the mortises, I place a 3° wedge on the mortising table along with a short wedge (made from an offcut) beneath the leg to counteract the taper angle. I flip the wedge assembly to match the side I’m cutting.
Because the mortiser’s depth stop doesn’t reliably control depth at this angle, I mark the chisel with a pen 15/16 in. up from the tip and determine the mortise depth by eye. This will cut the mortises about 1/16 in. deeper than the tenon length, which makes for an easy assembly. To cut the stub-tenon groove, I remove the 3° wedge but leave the tapered offcut beneath the leg to make it parallel to the mortiser bed. I set the depth stop and chop the stub-tenon groove along the leg.
Prepare the aprons
To set the splay angle for cutting the aprons to length, I attach a 3° wedge along the fence of my crosscut sled with double-stick tape. I cut one end of each apron, then use a stop block while cutting the other ends to ensure that all four aprons are identical.
With the splay angle already set, cutting the tenon shoulders is simple using a dado stack. I set the fence 7/8 in. to the outside of the stack and run the ends of the aprons against the fence. Using a test piece, I adjust the blade height to fine-tune the fit; the tenon should be easy to insert but tight enough so it won’t fall out when turned upside down. I take multiple passes to remove the waste, moving the fence closer to the blade for each pass. On the final pass, I bury the blade in a sacrificial fence to remove the last bit of material.

Each apron receives two tenons, plus a stub tenon that runs the whole height of the apron. I use the bandsaw to remove waste between my two tenons. I fine-tune the tenons with a shoulder plane, trimming only the inside faces to maintain proper offsets from the front of the leg. Because adjacent apron tenons will meet inside the leg mortises, I partially bevel their ends so they seat fully in their mortises.
| From Fine Woodworking #324
To view the entire article, please click the View PDF button below. |
 |
Sign up for eletters today and get the latest techniques and how-to from Fine Woodworking, plus special offers.
Download FREE PDF
when you enter your email address below.


