

Building the Hathaway Dresser – FineWoodworking
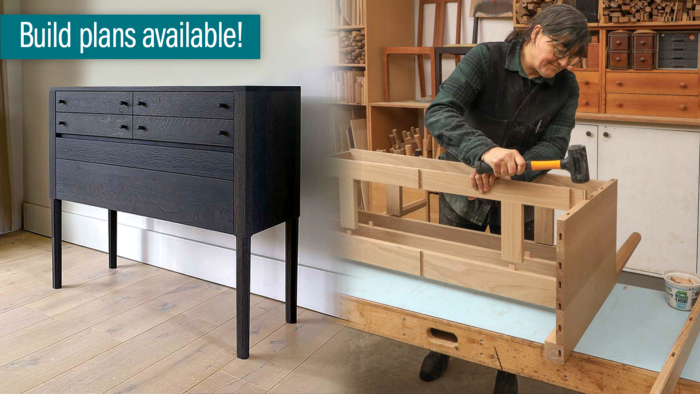
Click here to download the full digital plans for this dresser.

The Hathaway dresser, named for a beloved aunt, is a staple in our shop, and we build it in three formats—the long, lateral, original version with 12 drawers; a five- or six-drawer highboy; and the six-drawer Half Hathaway that we’re building in this article.
The original piece was commissioned by a client needing storage in a generous entryway. The high, beveled, and tapered legs that define the case were the starting point, designed to allow tall rain boots and other footwear to be tucked below. The spare, flat surface of the piece and the graphic appeal of drawers punctuated only by knobs was inspired by Shaker furniture, while the overall form takes its cues from Georgian and Edwardian sideboards.
The simple appearance of the Hatha-way hides a complex arrangement of intricate parts, making it a challenging but rewarding project. Sliding dovetails, slip tenons, and long-grain laminations provide a rigid structure housing drawers that slide smoothly on wood runners. We use exactly the same structure and joinery—and even many of the same jigs shown here—when we’re building other versions of the dresser, which makes an exacting process more efficient. And these same approaches, which produce a strong, durable, and functional chest of drawers, can be applied to case pieces in general.
Legs at the outset
The dresser’s tall legs frame the drawer faces and form one smooth, flush surface with the side panels. Using 8/4 or 9/4 material, we choose straight-grained, rift-sawn boards to ensure that the legs blend seamlessly with the side panels and have minimal grain runoff on the front face.

 Stop the bevels. With the leg blank still square and the table-saw blade 30° off vertical, use a V-cradle and the miter gauge to make a crosscut establishing the end of the bevel on each corner of the leg.
 Start the taper. Using a taper jig, cut two faces of each leg.
 Finish the taper. To taper the third and fourth faces of the leg, add a 1/8-in.-thick spacer to the jig.
 Saw four bevels. To cut the stopped bevels, use the same taper jig but with a 15/16-in.-thick auxiliary fence screwed to the main fence. Set the blade to 45° and clamp a board across the outfeed table to limit the cut.
 Fine-tune the stopped bevels. Use a chisel to clean up the corner where the bevels meet the stop cuts, then a scraper to smooth the bevels’ sawn surface.
To shape the leg’s tapered and beveled profile, we use two shopmade table-saw sleds. The first sled, a V-shaped cradle pushed by the miter gauge, produces an angled stop cut on each of the leg’s four corners that defines the top end of the bevel. To make this shallow crosscut, the sawblade is set to 30° and the kerf is cut 16-3/4 in. from the bottom of the leg.
The second sled, with a runner in the miter slot, serves both for tapering and beveling. Using a rip blade, we taper the leg in four passes, turning the leg after each pass and placing a 1/8-in. spacer between the fence and the leg for the third and fourth passes.
Once the legs are tapered, we use the same jig to cut the stopped bevels. To do this, we screw an auxiliary fence, 15⁄16 in. thick, to the jig’s fence and set the rip blade to 45°. A scrap clamped to the outfeed table limits the travel of the jig, so the bevels end just shy of the stop cut. Each bevel cut leaves a barely attached waste piece that is easily pulled off. We remove the remaining material with a sharp chisel, and then we clean up the faceted surfaces with a cabinet scraper and a sanding block, taking care to keep the edges crisp.
On to the major case parts
The case joinery is a combination of sliding dovetails and slip tenons. We begin it by machining sliding dovetail sockets: in the underside of the top, in the top web frame, and in the side panels. To cut all those sockets we use one jig, which has a pair of fences that control the path of a router. We mark centerlines on the jig and the workpieces to align the cuts.
 One jig handles a raft of sockets. Two parallel fences guide the router in cutting hybrid dado-dovetail sockets on the underside of the dresser’s top. A straight bit cuts the central dado that enables installation of the vertical dividers after the top is in place, and then a dovetail bit cuts sockets at both ends. A roll of tape (top photo, right) makes a handy router stand.
 Side-panel sockets. The same jig is used to rout the dovetail sockets on the case’s side panels. The jig will also be used to cut the sockets in the top web-frame rails that will accept the vertical dividers.
 Measure for tails. Use a wheel marking gauge set to the depth of the dovetail socket to scribe shoulder lines on the parts receiving tails. The lines are not for layout but are to ensure a cleanly cut dovetail shoulder.
 Tails up. All the sliding tails are cut on the router table. The workpiece is run vertically and supported by a square following block. The bit is the same one used in the handheld router to cut the sockets.


Slip tenons link legs to sides. Using a Domino joiner, cut mortises in a side panel; a scrap clamped to the bench prevents the workpiece from sliding. Then cut mating mortises in the legs. A biscuit joiner could be used in place of the Domino for these long-grain joints.
 Test the fit. After cutting the slip-tenon mortises (carefully avoiding the dovetail sockets in the side panel), dry-fit the leg and side panel.
 Dry-assembly time. The legs, side panels, and web frames all get dry-assembled in order to assess the joinery and custom-fit the vertical dividers.
The dovetail sockets in the underside of the top, which accept the vertical dividers, stop short of the top’s front and back edges, so the dividers need to be slid into place from the center. To make this possible, the center section of the joint is a dado wider than the sockets. To create this hybrid dado-dovetail, we start by using a 7/8-in. straight bit to cut a dado 5/16 in. deep and stopped 3 in. from the top’s front edge and 4 in. from the back edge.
With the dadoes completed, we use the router and jig again but switch out the straight bit for an 8°, 11/16-in. dovetail bit. Using the dado as an entry point, we cut 1/4-in.-deep dovetail sockets front and back. They both should stop 3/4 in. from the edge of the top.
The next set of sockets is cut in the top web-frame rails to accept the six vertical drawer dividers. To make these cuts, we clamp the two web rails together along with a backer board of the same thickness. Finally, again using the same router jig and bit, we cut dovetail sockets in the case side panels to accept the ends of the web-frame rails. To eliminate the need to square the end of these sockets, we cut them 1/4 in. overlong.
To cut the tails on the ends of the web rails and vertical dividers that fit into all those dovetail sockets, we use the same 11/16-in. dovetail bit, but in a router table. The parts are held vertically for the cuts, and a high fence and backer board are used in combination for a stable, clean cut. The vertical dividers get tails only on the bottom end for now; the top end is left long to be cut to length and dovetailed after the case is dry-assembled.
Doing the Dominos
Slip tenons make easy, strong connections between parts; they also keep adjacent planes aligned and create a very sturdy case in combination with the dovetail joinery. We cut them with a Domino joiner, but a plunge router can also do the job.
We begin by mortising the legs and side panels. Then we turn to the web-frame members, which are connected to each other with Dominos. Only the front web rails will get glued, however; the mortises in the rear web rails are left dry to accommodate wood movement in the case.
Stretchers and rail caps are next. To cut them to length precisely, we dry-fit the legs, side panels, and web frames; fit the stretchers and rail caps; and mark for Dominos.
Fit the vertical dividers and the top
At this point, the vertical dividers are still overlong; to measure their height accurately, we place a 1/4-in. spacer block on top of one of the legs, knife a line on the adjacent divider, and crosscut to the line. Once all six dividers are cut to that length, their top tails can be cut on the router table.

Vital marks for crosscutting and notching. Sliding a vertical divider into its dovetail socket in the web frame, Earnshaw holds a 1/4-in.-thick spacer on top of the leg to scribe a crosscut line. She will also knife a line on the front edge of the divider to lay out the notch where the divider wraps the leg.
 Dovetail the dividers. After crosscutting the divider on the scribe line, cut the top end dovetail at the router table.

 Cut the corner. Two passes on the table saw create the notch that lets the divider fit around the leg. A clean cut and good fit are important, as the notch will be a glue surface at assembly.
 Don’t forget the drawers. With the dividers fully fitted, cut the dovetail sockets across them that will receive the runners for the upper drawers. Here use an 8°, 1/2-in. dovetail bit.
The front and rear vertical dividers at both ends of the case get notched around the legs. To lay out the notch, we push the divider into place until it contacts the leg, then mark with a knife. At the table saw, we cut the notch in two passes, taking care to fit each corner independently. A good fit will add significant structure when these pieces are glued to the legs.
With the tails and notches complete on the vertical dividers, the top can now befit. First, we remove the vertical dividers. Then we lay the top on the dry-fit case and clamp it down so that it doesn’t move as we slide the vertical dividers back into place. We mark the exact length of the top (which has been left 1/2 in. overlong until now) and map locations for Dominos to connect the top with the top rear stretcher. We then remove the top, cut it to length, and mortise for Dominos.
Drawer works
With the case nearly ready for assembly, we turn our attention to the drawers. The fronts are milled to thickness but left slightly oversize in height and width so there is room to adjust the reveals once the drawers are hanging.

 Half a dovetail socket. The dresser’s wide lower drawers run on shopmade slides. The runner housing, which is glued to the underside of the drawer box, has one dovetailed side and one square side.

Routing the runner. The runner, which will be screwed to the web frame, gets a 14° dovetail angle routed on one edge and a rabbet on the other.
 Running together. The half-dovetail shape of the runner and housing make for a smooth, secure sliding action. They’re easy to adjust and resist sticking.
All the drawers glide on wood runners. We prefer their look and feel over commercial metal slides and can rest assured that with a little wax they will continue to run true for decades without sagging or needing adjustment. The upper drawer runners are dovetailed into the vertical dividers and run in grooves milled in the sides of the drawer boxes. The lower drawer runners are fastened with screws to the web frames and run in housings that are glued to the underside of the drawer boxes.
To cut the dovetail sockets in the vertical dividers, we use the router table with an 8°, 1/2-in. dovetail bit and make the sockets 1/4 in. deep. The corresponding tails on the runners can be cut using the same bit buried in a fence on the router table and set to the same height.
The lower drawer runners are a half-dovetail in section—angled on one side and square on the other. To make the housings for them, we start by removing most of the material with a dado set on the table saw. Then we cut the angled side at the router table, using a 14°, 3/4-in. dovetail bit.
We make the half-dovetail runners at the router table. They need to be sized so that they can pass freely through the housings without much play. Once the fit is tested, the housings can be attached to the underside of the drawers and the runners to the web frames. To guarantee correct placement of the housings and runners, we use a square spacer panel registered to a centerline.
Glue-up
With most parts machined and ready, we can begin gluing up the case. We take our time and do this in several stages to ensure a clean, square outcome. This is best done on a flat, level bench or torsion box.
 |
 |
Heidi Earnshaw and her assistant Tim Steadman build custom furniture in Lanark, Ontario, Canada.
|
From Fine Woodworking #325 To view the entire article, please click the View PDF button below. |
 |


Sign up for eletters today and get the latest techniques and how-to from Fine Woodworking, plus special offers.
Download FREE PDF
when you enter your email address below.


