

Creating Coopered Lampshades – FineWoodworking
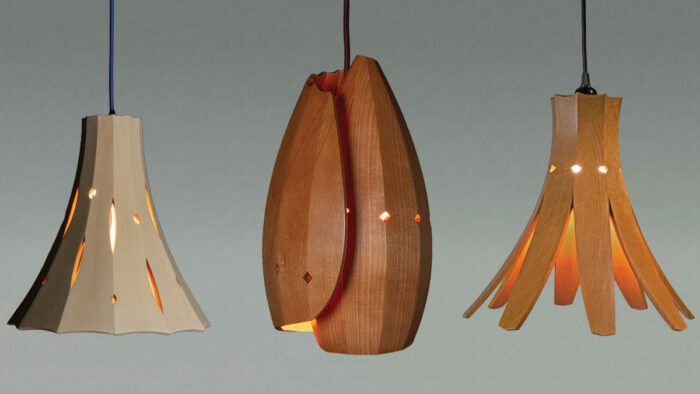
Synopsis: Seth Rolland introduces coopered lampshade making as an accessible and flexible woodworking technique. The basic process starts with a full-size layout to determine stave dimensions, followed by cutting, beveling, and dry-fitting staves using table-saw jigs and calculated angles based on the shade’s slope and number of staves. Once the staves are prepared, they are often decorated, taped, glued, and assembled—sometimes in halves—to manage alignment and achieve tight joints. Rolland highlights how variations in stave width, bevel angle, or even curved staves allow for endless design possibilities beyond the basic cone shape.
If you’ve never immersed yourself in coopering, making a lampshade is an excellent place to dive in—or to dive in deeper. It combines a reasonably simple technique with absolutely endless possibilities for design. I love the rhythm of facets created by the staves and how simple it is to punctuate them with pierced cutouts. Making these shades takes very little wood, and often the offcuts and extra staves can combine to become interesting pieces of their own.
I also love how playful you can be with the overall forms of the shades. Once you have the process down for creating a cone-shaped shade, it’s a short step to experimenting with ovals and other shapes by using staves of different widths or different bevel angles. In this article I explain the process of laying out and cutting staves for a conical shade, the simplest kind. But the shade you’ll see me assembling here is actually oval. The methods I use to cut out and assemble the staves are the same for conical and oval shades; the difference is in the layout. To learn how I lay out an oval shade, see “Elliptical Layout for a Coopered Lampshade.”
 Layout for a conical shade
 Layout for a conical shade
To start a conical lampshade design, make a full-size drawing of the profile you want it to have. All you need is a tapered trapezoid showing the shade’s height and its width at the top and bottom. Next, use a compass set to half of those widths to draw two concentric circles; these represent the top and bottom of the shade as seen from above or below.
Decide the number of staves you want, divide the larger circle by that number of segments, and draw two radius lines representing the sides of one stave. Measure the distance between the two radii at the inner and outer circles to get the width of the staves at their top and bottom. The length of the staves is the same as the length of the sides of the trapezoid you drew. To see how you like the shape in 3D, use these measurements to cut a set of staves from cardboard, then tape them into a cone.
Beveling the staves
If you’re happy with the design in cardboard, mill up a batch of stave blanks. I generally use relatively quiet, straight-grained wood to keep the focus on the faceted form of the finished shade. My stave blanks are usually 5/16 in. to 3/8 in. thick, and I always make some extras.
I cut the staves to shape using a couple of simple jigs on the table saw. To determine the bevel angle of the blade, you need to factor in the slope of the shade (which you can measure on your trapezoid drawing) as well as the number of staves. I use an online app that one of my students created (available at ferobevel3.netlify.app). Plug in the slope and the stave count, and it tells you the bevel angle you need.
Cut your stave blanks to length, and on the face of one of them draw lengthwise lines representing the two long edges. At both ends of the blank, with a bevel gauge set to your bevel angle, carry those lines across the end grain. Now turn to making the first beveling jig.
Each jig has a base, a fence, a backstop, and a couple of toggle clamps. Before mounting the fence on the first jig, set the table saw’s blade to your bevel angle and rip the base; its outer edge now represents the line of cut. To establish the location of the jig’s fence, set the marked stave on the base so the angled markings on the end grain match the line of cut. Press the fence against the other edge of the blank and screw the fence to the base. Screw down a stop block at the back end of the blank to guide placement and add safety.
Mount the toggle clamps, and cut the first bevel on all the blanks.

|
|
|
|
|
|


Make a second jig using the same base, but with a fence that is beveled so the sawn edge of the blank will nest against it. A cutoff from one of the staves works well for this fence. Again, use your marked stave to locate the fence.
Once you’ve beveled the second edge of all your staves, tape them up in a dry assembly. If the angles are more than slightly off, adjust the saw’s bevel angle, shift the table saw’s fence slightly, and use the second jig to recut the staves. This will make the finished shade just a bit smaller.
Stave shaping and assembly
Before glue-up, do any decorative work you like, shaping the ends of the staves and making cutouts along the edges. Sand the inside faces of the staves, and then apply tape beside the bevels to reduce glue cleanup.

Lay all the staves side by side with their inside face down. Stretch blue tape across the joints, then turn the whole assembly over and apply glue to the joints. Because getting perfect closure on an assembly with so many joints can be a challenge, especially on oval forms, I often glue up shades in two halves. In those cases, leave two opposite joints unglued on the first assembly, squeezing the shade to make sure the glued joints are tight and the error accumulates in the unglued ones. When the glue cures, separate the halves and finesse their joints for a second assembly. After the final glue-up, remove all the tape, sand the outside of the shade, and apply finish.
Variations on the theme
In a conical shade, all staves have the same width and bevel angle. But to make an elliptical shade, you either keep the bevel angle constant while changing the width of the staves, or keep the stave widths constant while changing the bevel angle from joint to joint.
Think of an elliptical shade in quadrants. If you are using 16 staves, for example, each quadrant will have four staves that differ from each other either in width or bevel angle. All four quadrants will have the same matched set of staves.
You’ll need a pair of jigs for each of the four different stave types, so in this example you would make eight beveling jigs. It sounds like a lot, but the jigs are very quick to make and to modify.
As with an oval shade, you can cooper a spiral shade either by changing the bevel angles between staves or by keeping the bevel angle constant and changing the width of the staves. This second method is easier to cut, but it can be more challenging to lay out.
I have made a number of lampshades with curved staves. The curves can be sawn at the bandsaw, bent-laminated, or steam-bent. If you steam them, it’s important to dry them carefully because you need the curves to match each other closely. To do the bevel cutting on gently curved staves, I have made table-saw jigs with a shaped block on the base that provides either convex or concave support beneath the stave.
-Seth Rolland makes custom furniture and sculpture in Port Townsend, Wash.
| From Fine Woodworking #324
To view the entire article, please click the View PDF button below. |
 |
Fine Woodworking Recommended Products
Suizan Japanese Pull Saw
A versatile saw that can be used for anything from kumiko to dovetails. Mike Pekovich recommends them as a woodworker’s first handsaw.
Sign up for eletters today and get the latest techniques and how-to from Fine Woodworking, plus special offers.
Download FREE PDF
when you enter your email address below.


