How to Replace the Blade on a Porter Cable Biscuit Joiner
Some of us use our biscuit joiner daily, others on a weekly or monthly basis, but, no matter your frequency of use, eventually, you will need to replace its blade. A sharp blade keeps your joiner fast, efficient, and precise and when one’s power tools have these qualities, usually the crafter behind it does too.
Fortunately for us crafters, then, replacing the blade on a Porter Cable biscuit joiner is a relatively simple process. Despite a slightly more complicated chip deflector and lock pin, changing your Porter Cable biscuit joiner blade requires little more than a few minutes, a screwdriver, and an Allen wrench.
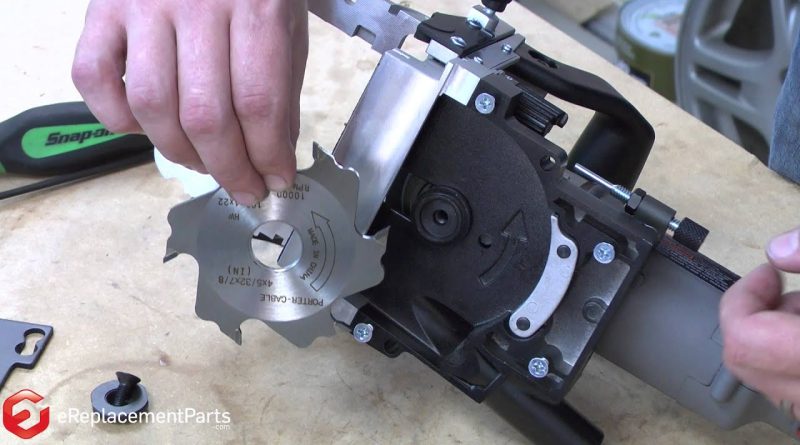
As with all power tool repair procedures, the first step in changing your joiner blade is disengaging and unplugging the tool. Next, simply flip the tool over and loosen the screws in the bottom plate. Your Porter Cable biscuit joiner should have four screws and because this tool also features tapered screw holes, you will not need to entirely remove the screws to remove the plate; instead, you can simply slide the plate off (slide the plate towards the butt of the tool and lift to remove). This, of course, gives you access to the blade.
Wait! Before grabbing at the blade, though, you must depress the lock pin. The lock pin on Porter Cable biscuit joiners is at the top front of the tool (more-or-less) beneath the handle. Pressing this pin prevents the blade from spinning allowing users to safely remove it.
The trick, though, is that the lock pin must be depressed constantly as you remove the blade and that the blade must be removed with an Allen wrench. So, while depressing the locking pin with your secondary hand, use your primary hand to insert your Allen wrench into the center of the blade bolt, loosen and remove it. Carefully remove the blade.
Directly beneath the blade, the Porter Cable biscuit joiner has an adjustable chip deflector. This mechanism allows the tool to accommodate both standard-sized blades and smaller face-frame blades. Depending upon the size of the new blade you’ve put onto the joiner, you may now need to adjust the chip deflector.
For standard-sized blades, this swiveling mechanism should remain in the horizontal (left-right) position (or, more-or-less parallel to the directional arrow stamped above it). If, however, you installed a smaller blade, you will need to pull the engine forward to release it and shift the chip deflector to a vertical position (so that it now points to the front of the tool and crisscrosses with that directional arrow).
Next, you must install the new joiner blade. The blade will have a similar directional arrow printed on the surface. This arrow is designed to ensure users install the blade with its teeth facing the right direction. Install the blade so that its arrow points in the same direction as the directional arrow on the tool. Pop the blade into place and replace the washer and bolt. While depressing the lock pin tightens the bolt over the blade.
After securing the blade, you need only slide the bottom plate back into place and tighten down the four screws that keep it there. And that is exactly that. Give yourself a pat on the back and know that your Porter Cable biscuit joiner is now as good to go as you are.


