

From the Archives: How to Sharpen Roughing and Spindle Gouges
This is an excerpt from Fine Woodworking #12, Fall 1978
Click here to read the full digitized issue.
Be very critical regarding the shape and bevel length of brand-new gouge blades. You may find that a roughing-down gouge is not ground straight across, a condition which must be remedied on the grindstone. The bevel length will almost certainly be too long, not the correct angle of 45°. Sometimes a lot of metal (and money) has to be ground away before the correct angle is reached. As a temporary measure, a very short 45° angle can be ground on the longer bevel. This is against another basic woodturning principle, which is that no tool has more than one bevel on the cutting edge. Successive grindings, however, will eventually get down to one bevel of 45°. Do not try this dodge on new coving (spindle) gouges.
The grindstone is an important tool in the turner’s shop and should be used not only as a “grind” stone but as a “sharpening” stone. The grit grade must not be so coarse that a sharp edge cannot be ground, or so fine that an edge can easily be burned at the tip. A good medium grit is a carborundum (silicon carbide) dry wheel A54-N5-V30W or an equivalent grade. The diameter should not exceed 7 in. and the width should be at least 1 in. The stone should revolve towards the user at the fastest speed possible, although not faster than the safety rpm marked on its side. Safety glasses are a must.
The stone must be kept to its original shape and completely free from dirt, swarf, and glazing. As an example, after, say, three new tools have been shaped and sharpened, the stone will need cleaning. This is achieved with either a diamond or star-wheel dressing tool. The latter is much cheaper and just as effective.
Hollow grinding is when the whole of the bevel of the tool, from heel to sharp edge, is in full contact with the stone’s circular surface, and thus takes on the negative contour of the stone. Grinding has to stop at the exact moment the cutting edge of the tool comes in contact with the stone. This sounds simple, but when I watch my pupils trying to do it I realize how frustrating doing this properly is to learn.
Beginners at grinding usually make several common mistakes. First, they hold the tool far too firmly and stiffly when approaching the stone. The more relaxed hold is with one hand over the tool, holding it down on the rest, with just the fingers of the other hand around the handle. There should be just enough firmness to hold the tool in place. An efficient stone of the right grit will do its work all by itself and need not be pushed. Pressure leads quickly to burning, whereas with no pressure the tool can be rested on the running stone for considerable time before it even gets hot.
Inclining the head to one side to see if the tool is being presented at the proper angle is another common fault. There is little control when watching from the side. The head and eyes should always be directly behind the blade and handle.
Another fault—lifting the blade off two or three times to inspect it—results in the bevel surface looking like a badly plowed field. It is almost impossible to replace the blade at the exact grindstone height from which it is taken.
Roughing gouge
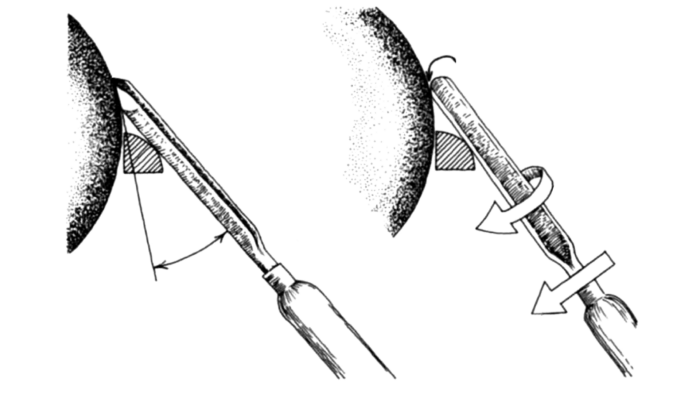
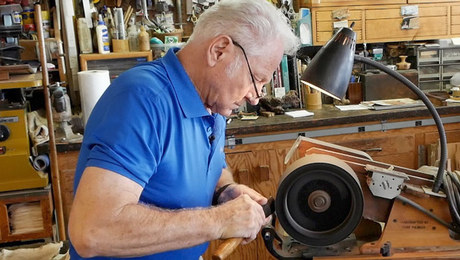
With a roughing-down gouge we are grinding a straight across edge, and it is important to roll the blade so that at all times it is at right angles to the stone. With a right-handed operator, their right hand on the handle keeps the tool at this angle, and their eyes on the edge tell his hand what handle adjustments to make. The diagram and photos show how to proceed.


A stream of sparks traveling on top of the flute indicates that the edge has been reached, and I advise beginners to stop right before or just at this point. What happens is that the edge is broken into thousands of little cutting burrs or sawteeth, like a tiny breadknife or steak knife. Such an edge works well in woodturning and when blunt is quickly and easily resharpened. Over-grinding the edge produces only comparatively few thick burrs, easily broken and blunted by the revolving wood. To avoid over-grinding, stop as soon as the sparks travel on top of the edge. Then the operator should point the gouge straight at their face and look directly at the edge. The places that reflect light have not yet been reached by the sparks. After two or three more careful passes on the stone, these areas of light should have disappeared and the edge will be sharp. Another test is to feel around the inside of the flute with a fingertip. There should be a minute roughness all around. I now go directly to the lathe, without any attention from the oilstone, where the tool cuts efficiently for a short time before it needs to be resharpened. When this is required, the heel of the bevel is put into contact with the stone and the handle is gradually lifted until the sparks appear at the edge—it takes just a few seconds.
The beginner, who should stop grinding just before the hollowing-out bevel meets the cutting edge, should hand hone to a finish with a flat medium to fine oilstone, keeping it firmly in contact with the heel of the bevel and the edge of the tool, in a dead straight plane without any rocking motion. The partly hollow-ground bevel will save time in sharpening, because there is less metal to remove than if the bevel were totally flat. The tool can be used for a considerable period, hand-honing at frequent intervals until the hollow in the bevel almost disappears. Then it must be formed again. A completely hollow-ground tool is perfect, a dead straight bevel is good, but the slightest trend towards a “belly” or roundness of the bevel means the tool is useless.
Coving gouges
I have a “black-iron” coving gouge, entirely handmade before I was born, which is a beautiful tool to use. The underside is slightly more than a half of a circle in shape and a finger moves around it smoothly without hindrance. Imagine a pencil cut lengthwise down just above the diameter; the bigger portion would be the same shape as my gouge. A gouge works with a rolling or scooping action, depending on the task, so it should be obvious that the fully rounded pencil shape is ideal for both purposes, the underside offering no resistance to the edge of the tool rest.
Nowadays, for cheapness or lack of skilled labor, most coving gouges are brutally stamped out by machine, which, at best, can produce only a half circle. At worst the underside of the tool has two almost straight sides, two corners and a semi-circular bottom. Imagine this doing a smooth full roll on a rest! It is well worth the time to remedy these defects by grinding—it would be exceedingly difficult to make them worse. Again, the blade of the gouge is not likely to be the ideal shape. Common faults are a second bevel at the tip, a flattened cutting edge, the top not nearly rounded over, leaving corners (the term “fingernail” is very descriptive of the proper shape), and often the bevel is not long enough.
Unlike the roughing-down gouge, which always has a 45° bevel, the bevels of coving gouges can be varied to suit the user, although they must not be too short. As a guideline, measure the breadth of the bevel of the roughing-down gouge, and at least double this for the coving gouges. The bevel of the 1/4-in. gouge will perform better if it is longer than that of the 3/4-in. gouge.
Begin grinding with the blade on the rest, flute up, with the point of the gouge in the middle and just clear of the stone. Unlike grinding the roughing-down gouge, it is not good enough just to roll the blade from side to side because this operation would soon remove the point. The handle must be lowered as the blade is rolled to the left, so the extreme left-hand corner rides up to the same height that the point was when the operation started. The movement is then reversed, raising the handle as the point rolls onto the stone and lowering it as the right-hand edge comes around. A beginner should try some dry runs on a motionless stone, experimenting by look and feel with the movement needed to grind the bevel evenly. I keep the handle straight up and down during the whole operation. A beginner might find it easier to move the handle slightly from side to side, although I don’t think the bevel can ever be ground as evenly this way. Again, the grinding need not be continued right to the edge. The safer but more laborious method of hand-honing can finish it off.


Sign up for eletters today and get the latest techniques and how-to from Fine Woodworking, plus special offers.


